Boo the Ghost Amigurumi — Free Crochet Pattern
Beginner Friendly
Perfect for those just starting their crochet journey, with clear instructions and simple techniques
Single-Day Project
A satisfying project you can complete in a single afternoon or evening.
Handmade Gift
A beautiful keepsake — free forever. Read online or print at home.
About This Boo the Ghost Amigurumi — Free Crochet Pattern
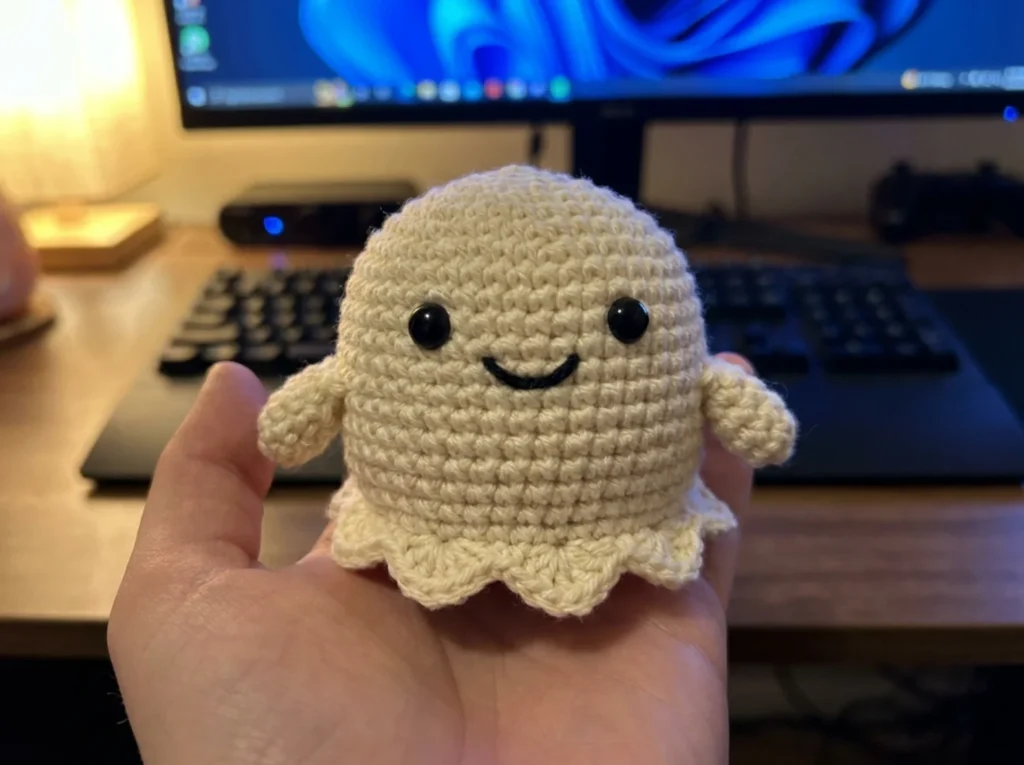
Welcome to Boo the Ghost — a soft, round-topped amigurumi with a gently flared bottom edge that gives it the classic “hovering” ghost silhouette, without a single scary detail in sight. No arms or legs to shape, no complex joins — just one continuous piece and a wavy hem worked right into the final round.
Finished, it stands about 10cm tall, perfect for a Halloween shelf display, a trick-or-treat bag charm, or a not-actually-spooky gift for a kid who loves Halloween but not the scary parts.
Most amigurumi ghosts are built as a simple dome and then have a separate scalloped piece sewn on for the wavy bottom edge — two pieces, one seam, one more place for things to look uneven. This pattern skips that entirely: the wavy hem is worked directly into the very last round of the body, using a repeating sc-hdc-dc-hdc-sc sequence instead of a plain decrease round. The result is a genuinely seamless flared edge, and it’s a technique worth learning even beyond this one project — the same “shell edging into a live round” trick works on hats, bag flaps, and plenty of other amigurumi shapes.
What’s inside
- Full materials list with suggested colors and quantities
- Every stitch explained with a full stitch key
- Round-by-round instructions for the body, wavy hem, and hands
- Eye placement and simple face embroidery guidance
- Step-by-step assembly instructions
Who this is for
Crocheters who’ve made a basic amigurumi shape before and want to learn one genuinely new technique (the live-round shell edging) without a complicated project around it. Also a great one-evening seasonal make.
Instant PDF-style pattern, free forever — no login, no email required. Read it on your phone, tablet, or print it out, whichever you crochet best with. 👻
Starting rounds — magic ring and first increases
Why You'll Love This Pattern 💛
The wavy hem is the real reason to make this one — it's worked directly into the body's last round instead of being a separate sewn-on piece, so there's genuinely no seam to line up or hide. It's a small technique that pays off on other projects too.
There's no face-and-limb symmetry to worry about the way there is on an amigurumi animal — just eye placement and a simple mouth, which makes this a fast, low-pressure seasonal make.
And because it's white or cream on white or cream, it photographs beautifully against almost any autumn-toned backdrop — it works just as well as a shelf piece in October as it does the rest of the year with a different name.
Shaping with increases — building the body
Switch Things Up 🎨
Try a soft grey or pale lavender instead of white for a "moody" ghost, or a warm cream for something that reads as friendly year-round rather than strictly Halloween.
Change the number of hem points for a different silhouette — 5 gives a bolder, more angular wave, 7 gives a softer, denser ripple. Either way, the technique stays exactly the same.
Skip the hands for an even simpler version, or embroider a tiny "boo" or a heart on the front instead of a plain mouth for a personalised twist.
Colour variations — personalise your make
Common Mistakes & How to Fix Them 🔧
You can't add stuffing once the wavy hem is fastened off — the opening is gone. Stuff firmly through the upper two-thirds while the body is still fully open, before starting the hem round.
Count carefully: each repeat is exactly 8 stitches (3 sc, the hdc-dc-hdc point, 3 sc). On a 30-stitch round that gives exactly 6 even points — if your count drifts partway through, the last point will look squashed or stretched.
Count precisely: between rounds 9 and 10, 8 stitches apart. A few rounds off changes the whole expression — pin the eyes in place and check from the front before securing the backs.
This usually means the piece wasn't stuffed firmly enough before working the hem — a softer body doesn't hold the flared shape as well. Stuff more firmly through the top before starting the wavy round.
Your hook is too large for your yarn — go down one size. Tight, firm tension is correct for amigurumi; if stuffing peeks through, the fabric is too open.
Assembly stage — pinning pieces before sewing
Materials Needed for Boo the Ghost Amigurumi — Free Crochet Pattern
🧶YARN
Worsted (medium, Category 4) weight yarn in white or cream (~30g). Cotton gives crisper stitch definition for the wavy hem; acrylic is softer and easier for beginners to work with.
🪝TOOLS & NOTIONS
3.5mm, or a size appropriate for your yarn. Go down a size for tighter, more even stitches.
9mm plastic eyes with a locking backing disc, not sew-on buttons.
black or dark grey, for the mouth. A single strand gives a finer, neater line than the full 6-strand thread.
about 20g, enough for a firm, well-shaped body. A soft, underfilled body won't hold the hem's wave properly.
blunt-tipped, for sewing and weaving in ends without splitting the yarn.
or a small safety pin, anything to mark your round starts.
small, sharp embroidery scissors make trimming yarn tails much easier than fabric shears.
— Gauge:
18 sc = 4 inches in sc
— Finished Size:
~10 cm tall
— Yarn Weight:
Worsted
— Hook:
3.5mm
— Terms:
US Crochet Terminology
— Cost:
FREE ✓
Crochet Abbreviations
Boo the Ghost Amigurumi — Free Crochet Pattern — Full Pattern
🧶BODY (one continuous piece, white or cream yarn)
🧶WAVY HEM (worked directly into R18 — no separate piece, no closing decreases)
🧶HANDS (Make 2, white or cream)
🧶ASSEMBLY
Assembly & Finishing Tips
💡 Weaving in ends
Use a tapestry needle to weave each tail back and forth through at least 5–6 stitches in different directions. A tiny dot of washable glue on the final stitch before trimming adds extra security for toys used by children.
💡 Sewing pieces together
Pin each piece firmly to the body before sewing. Use mattress stitch for the most invisible join — insert the needle under the same yarn bar on alternating pieces and pull firmly. Knot securely at start and end, weave both tails deep into the body.
💡 Positioning safety eyes
Take time here — eye spacing determines the character's entire personality. Closer eyes look more intense; further apart looks more friendly and playful. Pin both positions and step back before snapping the backs on permanently. Once snapped, eyes cannot be moved without damaging the fabric.
💡 Blocking
Not required for amigurumi, but lightly steam-blocking any warped pieces will relax the fibres. Hold a steam iron a few centimetres away — never let it touch the stuffing or safety eyes directly.
💡 Care instructions
Handwash in cool water with mild detergent, press gently to remove excess water, lay flat to dry. Many acrylic yarns are machine washable on a gentle cycle in a laundry bag — always check your yarn label.
⚠️ Important Notes
- Use stitch markers at the start of every round — don't rely on memory to count.
- Work with consistent tension throughout. Gauge swatch before starting if in doubt.
- Fasten off leaving long tails for sewing — at least 30cm for each piece you'll need to attach.
- Pin and check positioning of all pieces before sewing any of them permanently.
Beginner's Guide to Amigurumi 🌱
Amigurumi (Japanese: ami = knitted/crocheted + nuigurumi = stuffed toy) is the craft of making small crocheted characters. You start with a magic ring, work in continuous spiral rounds of single crochet, and shape the piece through increases and decreases — no seams, no joins, no turning.
The magic ring creates a closable centre with no hole. Wrap yarn around two fingers, insert the hook, yarn over and pull through. Work your first round into this ring, then pull the tail to close tight. Practise a few times — it becomes effortless quickly.
The invisible decrease — insert your hook through the front loop only of the first stitch, then the front loop only of the second stitch. Yarn over, pull through both loops, then yarn over again and pull through the remaining two. Working through front loops only makes the decrease blend into the fabric instead of leaving a bump.
Tension matters most. Amigurumi needs tight, firm tension so stuffing can't show through. If you can see white fiberfill peeking between your stitches, go down one hook size. The fabric should feel dense and firm — like a tightly woven canvas, not a loose net.
The finished Boo the Ghost Amigurumi — Free Crochet Pattern — ready to gift or display
You Ask, We Answer ❓
Completely and permanently free — no login, no email, no payment. Read online, print, or save to your phone. The only ask: don't redistribute or resell the written pattern itself.
Yes — you're welcome to sell handmade finished items crocheted from this pattern. Please credit Cozy Amigurumi as the pattern source when sharing online.
It replaces a normal closing decrease round with a repeating shell-stitch sequence worked into the live final round, creating a scalloped, flared edge without ever closing the piece into a dome — no separate hem piece needed.
Yes — embroidered eyes work fine too. Mark both positions with pins first and check they're level and evenly spaced before stitching either one.
6 points divides evenly into the 30-stitch final round (8 stitches wide "s-hdc-dc-hdc-s" repeat), giving a clean, even wave. You can adjust the stitch count per repeat for more or fewer points — see the Switch Things Up section.
Check you actually worked the hdc-dc-hdc "point" stitches and didn't accidentally single crochet the whole round. The taller stitches in the middle of each repeat are what create the wave.
It's better as a second or third project — you'll want to be comfortable with basic single crochet in the round first, since the wavy hem technique is easiest to learn once the fundamentals feel automatic.