Cuddly Bunny Amigurumi ŌĆö Free Crochet Pattern
Beginner Friendly
Perfect for those just starting their crochet journey, with clear instructions and simple techniques
Single-Day Project
A satisfying project you can complete in a single afternoon or evening.
Handmade Gift
A beautiful keepsake ŌĆö free forever. Read online or print at home.
 Magic ring & first rounds
 Building the shape
 Assembly in progress
 Finished & ready!
About This Cuddly Bunny Amigurumi ŌĆö Free Crochet Pattern
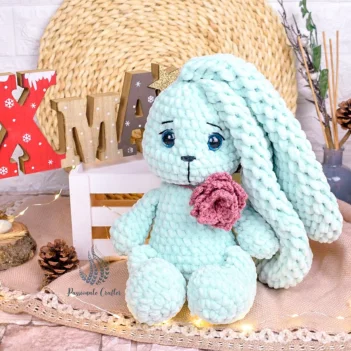
Meet the Bunny
Bunnies are adored for their playful nature and soft, fluffy appearance. Their long ears and twitching noses make them instantly recognizable and beloved by many. Creating a Bunny amigurumi allows you to capture this charm in a cuddly, handmade form, perfect for gifts or decorations.
The Bunny’s captivating features, such as its big expressive eyes and floppy ears, add to its appeal, making it a delightful companion for children and adults alike. Crocheting a Bunny allows you to express your creativity while honoring the whimsical qualities that make these creatures so special. Each stitch brings the Bunny to life, showcasing your unique style.
A Bunny amigurumi stands out among other crochet projects due to its versatility and charm. You can customize its colors, textures, and accessories, making each creation truly unique. Whether you opt for traditional pastel colors or vibrant, modern hues, your Bunny will be a reflection of your artistic vision.
Who Is This Bunny Pattern For?
This Bunny pattern is perfect for beginners who are eager to explore the world of amigurumi. The straightforward instructions guide you through each step, ensuring that you create a beautiful Bunny without feeling overwhelmed. It’s an excellent project for those who are starting their crochet journey or looking for a quick and enjoyable project.
Additionally, this pattern is ideal for various occasions, such as Easter celebrations, baby showers, or birthdays. A handmade Bunny makes for a heartwarming gift that can be cherished for years to come. Suitable for all ages, this amigurumi will bring joy to children and adults alike.
What Your Finished Bunny Will Look Like
Your finished Bunny will be approximately 15 cm tall, making it a perfect size for cuddling or displaying. The soft yarn will create a lovely texture, and you can choose colors that match your decor or the recipient’s preferences. The Bunny’s facial expression can be customized to convey personality, from a playful smile to a sweet, serene look.
Upon completion, your Bunny will be a delightful addition to any space. Imagine it perched on a shelf, nestled among books, or as a centerpiece for a child’s room. Its charming design and huggable form will surely bring smiles to anyone who sees it.
Choosing Yarn for Your Bunny
For your Bunny, a worsted weight yarn is recommended to achieve the ideal balance of structure and softness. Look for yarns specifically designed for amigurumi, as they tend to be durable and easy to work with. Brands like Lion Brand or Bernat offer excellent options in a variety of colors.
It’s important to avoid yarns that are too fuzzy or heavy, as they can obscure the Bunny’s details and make crocheting more challenging. Stick with smooth, medium-weight yarns that will hold their shape and allow for clean stitches.
Tips Before You Start Crocheting
Before diving into your Bunny project, make sure to check your tension. A consistent tension will ensure that your Bunny turns out the correct size and shape. If you’re unsure, crochet a small swatch to test your gauge and adjust your hook size accordingly.
Preparation is key to a smooth crocheting experience. Have all your materials ready and organized. This will help you avoid interruptions while you work and keep your focus on creating your adorable Bunny.
More Free Patterns You Will Love
If you enjoyed making this Bunny, be sure to explore our all free amigurumi crochet patterns for more adorable projects. YouŌĆÖll find a range of animals and themes that will inspire your next crochet adventure.
For those seeking even more intricate designs, visit our premium amigurumi PDF patterns shop where you can find exclusive patterns that offer unique challenges and beautiful results.
Pattern tested by the CozyAmigurumi team. Every round has been stitched, counted and verified before publishing ŌĆö so you can crochet with confidence.
Starting rounds ŌĆö magic ring and first increases
Why You'll Love This Pattern ¤Æø
Creating a Bunny amigurumi is a joyous experience that combines creativity with craftsmanship. The construction choices, such as using a soft yarn and a simple round shape, make it easy to achieve a delightful finished product. The Bunny's round body and oversized ears allow for a playful aesthetic that resonates with both kids and adults alike, making it a cherished keepsake or gift for any occasion. Your finished Bunny will boast a charming combination of soft textures and gentle colors, designed to evoke warmth and happiness. Picture a fluffy white Bunny with pastel pink accents on its ears and nose, exuding a huggable and inviting presence. Its sizeŌĆöabout 15 cm tallŌĆömakes it perfect for little hands to hold, while its friendly expression can brighten anyone's day. The joy of making this Bunny comes not only from the satisfaction of completing a project but also from the fond memories created along the way. Each stitch is a moment of focus and creativity, allowing you to unwind and connect with your inner artist. Whether you are gifting it to a friend or keeping it for yourself, the happiness this Bunny brings will be felt long after the yarn is put away.

Shaping with increases ŌĆö building the body
Switch Things Up ¤Ä©
For a Bunny that stands out, consider using a combination of colors that evoke different moods. A classic white and pink combo is timeless, while a grey body with teal ears brings a modern twist. Alternatively, a soft lavender Bunny with cream accents offers a delicate, whimsical vibe. For a playful touch, try a bright yellow body with contrasting purple ears, perfect for springtime celebrations. You can also adjust the size of your Bunny by using different yarn weights. For a mini Bunny, opt for DK weight yarn which will result in a finished size of around 10 cm. Conversely, using bulky yarn will create a chunky Bunny measuring about 20 cm tall, perfect for a statement piece on your shelf. Adding accessories can elevate your Bunny's charm. Consider crocheting a small bowtie or a flower crown to personalize your creation. You could also create a little backpack for the Bunny to carry small treasures or add a scarf for extra flair. These details not only enhance the visual appeal but also provide opportunities for creative expression in your crochet journey.
Colour variations ŌĆö personalise your make
Common Mistakes & How to Fix Them ¤ö¦
If your Bunny's ears turn out larger than expected, try adjusting your tension by using a smaller hook next time or crocheting more tightly to achieve the desired shape.
If you find your Bunny's body is too stiff, consider loosening your tension or using a larger hook size to make the crocheting process more comfortable and ensure a soft finish.
A head that isn't centered can be fixed by ensuring the body is securely attached at the right angle. Take care during assembly to check the alignment before fastening off.
Make sure to double-check the placement of safety eyes before securing them. If they look uneven, you can gently remove and reposition them while the yarn is still soft.
If your Bunny appears flat or lacks definition, ensure to stuff the head and body adequately. Use small amounts of stuffing for a more rounded shape and adjust as needed.
If your Bunny's stitches vary in tightness, practice consistent tension throughout your project. This will help maintain evenness and create a more polished finish.
If you accidentally place the wrong color yarn in certain areas, donŌĆÖt fret. You can carefully undo the stitches and re-crochet those sections to achieve the desired look.
If you forget to add facial features or accessories, take a moment to embroider or crochet them after assembling your Bunny. These details can elevate its charm and personality.
Assembly stage ŌĆö pinning pieces before sewing
Materials Needed for Cuddly Bunny Amigurumi ŌĆö Free Crochet Pattern
¤¦ČYarn
80g (main body colour for Bunny)
30g (inner ears and nose)
20g (optional accessory)
(blunt, size 13-16 recommended)
(sharp, for clean yarn cuts)
¤¬ØTools & Notions
approximately 50g
(x2)
minimum 3 (one per active section)
(6-strand, for nose and mouth)
(optional)
(for tracking round starts)
(for positioning pieces before joining)
ŌĆö Gauge:
18 sc = 4 inches
ŌĆö Finished Size:
~15 cm tall
ŌĆö Yarn Weight:
Worsted
ŌĆö Hook:
3.5mm
ŌĆö Terms:
US Crochet Terminology
ŌĆö Cost:
FREE Ō£ō
Crochet Abbreviations
Cuddly Bunny Amigurumi ŌĆö Free Crochet Pattern ŌĆö Full Pattern
¤¦ČPattern
Assembly & Finishing Tips
¤ÆĪ Secure Ears Properly
When attaching the ears, ensure they are positioned evenly on the head for a balanced look. Use slip stitches to attach them firmly, checking for alignment as you work.
¤ÆĪ Stuff Before Closing
Always stuff the head and body lightly before sealing them. This helps maintain the shape and ensures a cuddly finish, making your Bunny more huggable.
¤ÆĪ Use Locking Stitch Markers
When assembling, use locking stitch markers to hold pieces in place before securing them. This allows for easy adjustments and ensures everything stays aligned during assembly.
¤ÆĪ Check Proportions
As you attach the limbs, take a step back to check the proportions of your Bunny. Ensuring that the arms and legs are evenly spaced will give your Bunny a more appealing appearance.
¤ÆĪ Mix and Match Accessories
Feel free to customize your Bunny with accessories, such as bows or scarves. Attach these details securely to avoid them coming off during play, making your Bunny safe for children.
¤ÆĪ Finalize with Care
After assembly, take a moment to weave in any remaining yarn ends carefully. A neat finish will enhance your BunnyŌĆÖs overall charm and ensure it looks polished and professional.
ŌÜĀ’ĖÅ Important Notes
- Use stitch markers at the start of every round ŌĆö don't rely on memory to count.
- Work with consistent tension throughout. Gauge swatch before starting if in doubt.
- Fasten off leaving long tails for sewing ŌĆö at least 30cm for each piece you'll need to attach.
- Pin and check positioning of all pieces before sewing any of them permanently.
Beginner's Guide to Amigurumi ¤ī▒
Amigurumi is the art of crocheting small stuffed animals or objects, and making a Bunny is a delightful introduction to this craft. The process involves creating a series of rounds that build up the shape of the Bunny, allowing you to bring it to life stitch by stitch. With simple techniques, even those new to crocheting can create their very own cuddly Bunny in no time.
To start your Bunny, you will use a magic ring, which forms the base for the head or body. This technique allows for a tight beginning that can be easily adjusted, ensuring that your Bunny's shape remains intact. Mastering the magic ring is essential as it sets the foundation for all amigurumi projects.
The invisible decrease is another vital technique for achieving a smooth, rounded shape for your Bunny. This method helps to decrease stitches without leaving a noticeable gap, which is crucial for maintaining the Bunny's cute and rounded aesthetics. Practice this technique to ensure your Bunny looks professional and polished.
Paying attention to tension is crucial when crocheting your Bunny. Using the recommended yarn and hook size will help you achieve the correct gauge, allowing for a consistent and appealing finish. If your tension is too tight, your Bunny may end up small and stiff, while too loose tension can lead to a floppy Bunny that lacks structure.
The finished Cuddly Bunny Amigurumi ŌĆö Free Crochet Pattern ŌĆö ready to gift or display
You Ask, We Answer ŌØō
Yes, this Bunny amigurumi pattern is completely free for you to enjoy and create your own unique Bunny!
Absolutely! You are welcome to sell any finished Bunnies you create using this pattern, but we appreciate credit for the design when possible.
Worsted weight yarn is ideal for this Bunny, providing the right softness and structure. Look for smooth, durable yarns for the best results.
Ensure you follow the ear instructions closely and pay attention to your tension. Stuff them lightly for a better shape, and check that they are securely attached to the head.
Your finished Bunny looks great on a child's shelf, in a nursery, or even as a centerpiece during Easter celebrations. Consider adding it to a themed display with flowers or other spring decorations.
This Bunny makes a fantastic gift for birthdays, baby showers, or Easter celebrations. Its cuddly nature and charming appearance make it a beloved choice for all ages.