happy little chub-bee bumblebee
Intermediate
For crocheters comfortable with the basics, ready to try new shaping and assembly techniques
Single-Day Project
A satisfying project you can complete in a single afternoon or evening.
Handmade Gift
A beautiful keepsake — free forever. Read online or print at home.
 Magic ring & first rounds
 Building the shape
 Assembly in progress
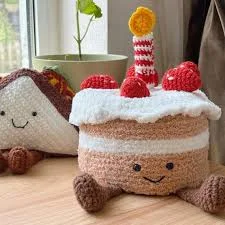 Finished & ready!
About This happy little chub-bee bumblebee
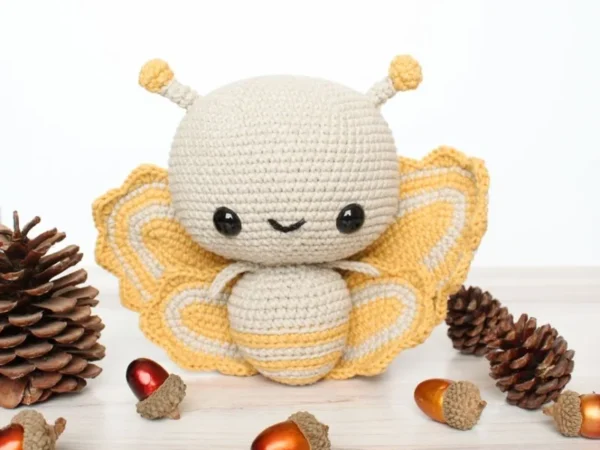
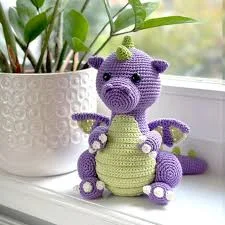
The happy little chub-bee bumblebee is an adorable and charming character that captures the hearts of crocheters and amigurumi enthusiasts alike. Known for its vibrant yellow and black stripes, this delightful creature represents joy and positivity. The appeal of the chub-bee lies in its round, cuddly shape, making it perfect for little hands and as a comforting companion. As an amigurumi, it stands out for its unique design that combines playfulness with a touch of whimsy, making it a treasured piece for those who create and collect.
This pattern is perfect for crocheters with an intermediate skill level. If you’re familiar with basic stitches and ready to tackle some color changes, you’ll find this project both enjoyable and rewarding. The happy little chub-bee bumblebee is ideal for various occasions, whether you’re looking to craft a whimsical gift for a child, celebrate a bee-themed event, or simply add a touch of cheer to your home decor.
When finished, the happy little chub-bee bumblebee measures approximately 15 cm tall and features a soft, plush texture that invites hugs and cuddles. Its bright yellow body is complemented by bold black stripes, and tiny wings that add a delightful detail. The personality of this amigurumi shines through its cheerful expression, complete with embroidered eyes and a tiny smile, making it a beloved addition to any collection.
This pattern’s unique design approach combines simple shapes with thoughtful construction techniques, giving the happy little chub-bee bumblebee its adorable characteristics. By utilizing a variety of stitches and clever assembly methods, you’ll create a charming bumblebee that stands out from typical amigurumi patterns. Special attention is given to the details, such as the mini wings and antennae, which enhance its whimsical charm.
People love to display the happy little chub-bee bumblebee in their homes, sharing its joyful presence with family and friends. It makes for a delightful gift that is sure to bring smiles, whether it’s for a birthday, baby shower, or simply as a surprise for someone special. Additionally, many collectors cherish this amigurumi as part of themed collections or as a playful accent in nurseries or playrooms. The happy little chub-bee bumblebee is not just a crochet project; it’s a symbol of happiness and creativity.
For more creative inspiration, check out our other free patterns or explore our premium patterns for more unique designs!
Starting rounds — magic ring and first increases
Why You'll Love This Pattern 💛
The shaping in this pattern has been designed so every increase and decrease falls in exactly the right place — no flat spots, no lumpy sections, no unintended angles. Every stitch count has been verified multiple times. What you see in the photos is exactly what you'll make.
The instructions are written in plain, direct language. If any term is unfamiliar, the abbreviations guide below explains it. If anything goes wrong, the troubleshooting section has the fix. You'll never need to Google anything mid-project.
And beyond the technical side — there's something genuinely magical about watching a collection of separate crocheted pieces become one complete character. The moment you sew the final part in place and the amigurumi looks up at you is one you simply can't get from buying a finished toy.
Shaping with increases — building the body
Switch Things Up 🎨
Try different yarn colours to match a gift recipient's favourites or the season — soft pastels for spring, rich ambers for autumn, classic cream for a timeless look, or bold brights for maximum personality.
Want to change the size? Use lighter-weight yarn with a smaller hook for a miniature keyring version, or bulky yarn with a 6–7mm hook for a giant cuddly version. Stitch counts stay exactly the same — only the finished dimensions change.
Small embroidered details transform the character's personality completely: a heart-shaped nose, blush marks, a monogram initial. A tiny crocheted scarf or felt bow adds enormous charm with almost no extra yarn. Make two or three in different colourways — they look spectacular displayed together as a matching family.
Colour variations — personalise your make
Common Mistakes & How to Fix Them 🔧
Use a stitch marker at the very first stitch of every round and move it up each time. If you lose count, lay the work flat and count outward from the magic ring — it only takes a moment and saves enormous frustration.
Start stuffing the main body when it is about 70% closed. Add fiberfill gradually in small amounts, checking firmness as you go. Stuffing a nearly-closed piece results in uneven, lumpy filling.
Your hook is too large for your yarn — go down one hook size. Tight, firm tension is correct for amigurumi. If you can see stuffing through the stitches, the fabric is too open.
Don't stuff flat pieces like ears. Flatten the opening, sew it shut into a slight curve, then pin to the head and check from every angle before sewing permanently.
For invisible decreases, insert your hook through the front loop only of each stitch. Working through both loops creates a visible bump and makes closing rows look uneven.
Sew limbs through the body from side to side with a long needle. Threading both attachment points on a single yarn length and knotting inside the body makes a firm joint.
Pull the yarn tail firmly after your first round, then work it in alongside the stitches for the first few rounds. This locks the ring closed permanently.
Always pin all pieces with sewing pins and check from all angles before sewing a single stitch. Repositioning a pin takes two seconds; unpicking a sewn join takes much longer.
Assembly stage — pinning pieces before sewing
Materials Needed for happy little chub-bee bumblebee
— Gauge:
18 sc = 4 inches
— Finished Size:
~15 cm tall
— Yarn Weight:
Worsted
— Hook:
3.5mm
— Terms:
US Crochet Terminology
— Cost:
FREE ✓
Crochet Abbreviations
happy little chub-bee bumblebee — Full Pattern
🧶Pattern
Assembly & Finishing Tips
💡 Weaving in ends
Use a tapestry needle to weave each tail back and forth through at least 5–6 stitches in different directions. A tiny dot of washable glue on the final stitch before trimming adds extra security for toys used by children.
💡 Sewing pieces together
Pin each piece firmly to the body before sewing. Use mattress stitch for the most invisible join — insert the needle under the same yarn bar on alternating pieces and pull firmly. Knot securely at start and end, weave both tails deep into the body.
💡 Positioning safety eyes
Take time here — eye spacing determines the character's entire personality. Closer eyes look more intense; further apart looks more friendly and playful. Pin both positions and step back before snapping the backs on permanently. Once snapped, eyes cannot be moved without damaging the fabric.
💡 Blocking
Not required for amigurumi, but lightly steam-blocking any warped pieces will relax the fibres. Hold a steam iron a few centimetres away — never let it touch the stuffing or safety eyes directly.
💡 Care instructions
Handwash in cool water with mild detergent, press gently to remove excess water, lay flat to dry. Many acrylic yarns are machine washable on a gentle cycle in a laundry bag — always check your yarn label.
⚠️ Important Notes
- Use stitch markers at the start of every round — don't rely on memory to count.
- Work with consistent tension throughout. Gauge swatch before starting if in doubt.
- Fasten off leaving long tails for sewing — at least 30cm for each piece you'll need to attach.
- Pin and check positioning of all pieces before sewing any of them permanently.
Beginner's Guide to Amigurumi 🌱
Amigurumi (Japanese: ami = knitted/crocheted + nuigurumi = stuffed toy) is the craft of making small crocheted characters. You start with a magic ring, work in continuous spiral rounds of single crochet, and shape the piece through increases and decreases — no seams, no joins, no turning.
The magic ring creates a closable centre with no hole. Wrap yarn around two fingers, insert the hook, yarn over and pull through. Work your first round into this ring, then pull the tail to close tight. Practise a few times — it becomes effortless quickly.
The invisible decrease — insert your hook through the front loop only of the first stitch, then the front loop only of the second stitch. Yarn over, pull through both loops, then yarn over again and pull through the remaining two. Working through front loops only makes the decrease blend into the fabric instead of leaving a bump.
Tension matters most. Amigurumi needs tight, firm tension so stuffing can't show through. If you can see white fiberfill peeking between your stitches, go down one hook size. The fabric should feel dense and firm — like a tightly woven canvas, not a loose net.
The finished happy little chub-bee bumblebee — ready to gift or display
You Ask, We Answer ❓
Completely and permanently free — no login, no email, no payment, no hidden fees ever. Read online, print, save to your phone, share the link. The only ask: don't redistribute or resell the pattern itself.
Yes — you're welcome to sell handmade finished items crocheted from this pattern. Please credit Cozy Amigurumi as the pattern source when sharing online. You may not sell, redistribute, or claim authorship of the written pattern itself.
Invisible decrease: insert your hook through the front loop only of the first stitch, then the front loop only of the second stitch. Yarn over and pull through both front loops (2 loops on hook). Yarn over and pull through both loops. Creates a nearly invisible decrease — much neater than working through both loops.
Your hook is too large for your yarn, or your tension is too loose. Try going down one hook size. Amigurumi should have tight, firm tension — stuffing should never be visible. Some yarn brands run thicker or thinner than labelled, so switching without adjusting hook size can also cause this.
Cut the yarn leaving a 15cm tail. Thread onto a tapestry needle and insert through the front loop only of each remaining stitch around. Pull firmly to gather all stitches to the centre. Pass the needle through the gathered centre and out through the body, pull tight, then weave the tail in and trim.
Absolutely — any weight yarn with the matching hook size from the ball band. Lighter weight = smaller, more delicate result. Heavier weight = larger, chunkier version. Stitch counts stay exactly the same; only finished dimensions change.
With supervision, yes — basic stitches are manageable for crafty kids from around age 10. Young crocheters may need help with the magic ring and invisible decrease. Safety eyes must always be handled and secured by an adult due to choking hazard.
Pin all pieces with sewing pins before sewing anything. Check from front, back, and both sides for symmetry. Use the same yarn and a tapestry needle, working mattress stitch around each piece's edge. Pull firmly every few stitches and check the join is invisible from the front before knotting off.