Beginner Friendly
Perfect for those just starting their crochet journey, with clear instructions and simple techniques
Single-Day Project
A satisfying project you can complete in a single afternoon or evening.
Handmade Gift
A beautiful keepsake — free forever. Read online or print at home.
 Magic ring & first rounds
 Building the shape
 Assembly in progress
 Finished & ready!
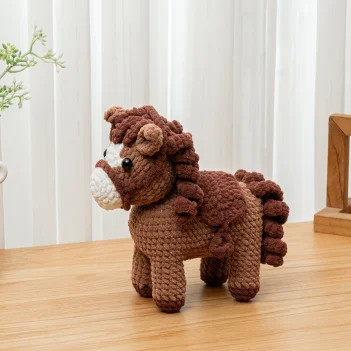
About This Horse Pattern
Meet the Horse
This Cuddly Horse amigurumi pattern is designed to create a soft, huggable companion for anyone who loves these majestic animals. The unique construction features an oversized head and plush body, making it irresistibly cuddly, perfect for snuggling. With its rounded shape and soft textures, this pattern stands out from other Horse designs, ensuring your finished creation will be a delightful addition to any collection.
Unlike many standard Horse patterns, this one emphasizes a gentle, plush appearance, achieved through specific yarn choices and stuffing techniques. The combination of a rounded head and a slightly larger body gives this Horse an endearing look that captures the playful spirit of these animals. Each stitch contributes to the overall softness, creating a design that is both charming and tactile.
This Cuddly Horse is not just about looks; it also offers the joy of assembling a unique character. The pattern includes carefully crafted body proportions, ensuring that your Horse will be stable when sitting, making it an ideal decorative piece for shelves or nursery decor. This design prioritizes comfort and cuteness, setting it apart from other patterns available online.
Who Is This Horse Pattern For?
This amigurumi pattern is perfect for beginners who want to dive into the world of crocheting plush animals. The straightforward instructions guide you through creating a beautiful Horse, making it an excellent project for those just starting their crochet journey. Additionally, it’s a wonderful choice for experienced crocheters looking for a quick and satisfying project.
The Cuddly Horse makes an ideal gift for various occasions, such as baby showers, birthdays, or as a comforting toy for children. Its soft design and friendly demeanor make it suitable for all ages, bringing joy to anyone who receives it. Whether you’re making it for a little one or as a decorative piece for yourself, this pattern is sure to be cherished.
What Your Finished Horse Will Look Like
Your completed Cuddly Horse will stand approximately 15 cm tall, making it an adorable size for cuddling or display. The use of soft, worsted-weight yarn results in a plush texture that invites touch, while the gentle colors typical of horses, such as browns and creams, provide a realistic yet whimsical appearance. The Horse will feature a sweet facial expression, enhancing its charm and appeal.
Imagine your finished Horse sporting a rounded face, with large, inviting eyes and a soft mane that flows down its neck. The combination of colors, such as a light tan body with darker accents for the hooves and mane, creates a visually pleasing contrast. This Horse will not only look delightful but will also feel wonderful to hold, making it an ideal companion or gift.
Choosing Yarn for Your Horse
For this Cuddly Horse, selecting the right yarn is crucial for achieving that soft and plush feel. A worsted-weight yarn, such as Lion Brand Pound of Love or Red Heart Super Saver, is highly recommended. These yarns are durable and come in a variety of colors, allowing you to create a Horse that matches your vision perfectly. Avoid using yarns that are too coarse or stiff, as they won’t give the desired cuddly effect.
When choosing colors, consider a light shade for the main body, complemented by darker shades for the mane and tail. This not only adds depth to your design but also highlights the features of your Horse. Ensure that the yarn you select is machine washable to maintain the Horse’s appearance over time, especially if it will be a toy for children.
Tips Before You Start Crocheting
Before diving into your Horse project, it’s essential to check your tension to ensure your stitches are tight enough to prevent gaps. This is particularly important for amigurumi, as loose stitches can lead to stuffing showing through. Practice with your chosen yarn and hook size to achieve a consistent tension that maintains the integrity of your finished Horse.
Begin by organizing your workspace and materials. Have everything you need within reach, including your yarn, hook, and any additional accessories. Familiarize yourself with the pattern and make note of any unique techniques, such as the invisible decrease, which will be vital for shaping the Horse’s head and body. Common beginner pitfalls include underestimating the amount of yarn needed or miscounting stitches, so take your time to double-check your work.
More Free Patterns You Will Love
If you enjoyed making this Cuddly Horse, you might also love exploring our all free amigurumi crochet patterns. There are plenty of adorable animals and unique projects that can inspire your next crochet adventure.
For those looking for more intricate designs, check out our premium amigurumi PDF patterns shop, featuring a variety of characters that will bring even more joy to your crafting experience.
Pattern tested by the CozyAmigurumi team. Every round has been stitched, counted and verified before publishing — so you can crochet with confidence.
Starting rounds — magic ring and first increases
Why You'll Love This Pattern 💛
The Cuddly Horse amigurumi pattern utilizes a unique construction that emphasizes an oversized head and plush body, making it extremely huggable. This design choice ensures that the finished Horse remains stable when sitting, allowing it to be a delightful companion for children and adults alike. The careful attention to detail, such as the rounded features and soft textures, creates an inviting toy that stands out from typical patterns available online. When finished, your Cuddly Horse will be a charming creation, approximately 15 cm tall, with a delightful blend of colors typical of real horses. The soft, worsted-weight yarn adds a touch of warmth and coziness, making it a perfect addition to any nursery or playroom. The Horse's friendly expression, with its big eyes and gentle smile, will surely melt hearts and bring joy to anyone who sees it. Creating this Horse will be a joyful experience, especially when you see the various parts come together. Each step of the process, from crafting the head to assembling the body, offers moments of satisfaction. The excitement of watching your Cuddly Horse take shape brings a sense of accomplishment, making every stitch worthwhile and filling your project with love and care.
Shaping with increases — building the body
Switch Things Up 🎨
Consider using a classic brown and cream combination for a traditional Horse look, or opt for a vibrant chestnut and white design for a more playful take. A grey and black palette can create an elegant appearance, while a pastel pink and white combo adds a whimsical touch, perfect for a child’s room. Each of these color combinations provides a unique charm and can be accentuated with different yarn textures to enhance the overall look of your Horse. For size variations, you can experiment with different yarn weights. Using DK weight yarn will yield a smaller Horse, approximately 10 cm tall, while using bulky yarn can create a larger Horse around 20 cm tall. Adjusting your hook size accordingly will also help maintain the desired shape and appearance, ensuring your Horse remains true to its cuddly design. Adding accessories like a tiny saddle or a crocheted flower crown can personalize your Horse. To make a saddle, create a flat rectangle and attach it securely to the back. A simple flower crown can be made by crocheting small flowers and attaching them around the head. These details not only enhance the visual appeal but also reflect your creativity in customizing your Cuddly Horse.
Colour variations — personalise your make
Common Mistakes & How to Fix Them 🔧
If the head of your Horse appears too large, check your tension and ensure you're using the correct hook size. Adjusting your stitches to be tighter can help achieve the intended proportions.
If the body feels wobbly, make sure you are stuffing it evenly and securely. Additionally, verify that the stitches are tight enough to hold the shape.
Ensure the ears are securely attached to the head using multiple stitches. If they feel loose, reinforce your connections with additional yarn.
When assembling the legs, measure them against each other to ensure they are the same length. Adjust the stitch counts if necessary to create uniform legs.
If the facial features are not aligned, consider using removable pins to position them before securing with stitches. This will help you get them just right.
If the tail appears too short, you can add additional rounds to the tail section or create a separate, longer piece to attach later.
If your stuffing is visible, check your tension and make sure to crochet tightly. You can also use darker yarn to crochet the body for better coverage.
To avoid visible color changes in your Horse, ensure you are changing colors neatly and consider using a slip stitch to secure transitions for a smooth appearance.
Assembly stage — pinning pieces before sewing
Materials Needed for Horse Pattern
🧶Yarn
80g (main body colour for Horse)
20g (mane and tail)
30g (face and inner ears)
20g (belly)
(blunt, size 13-16 recommended)
(sharp, for clean yarn cuts)
🪝Tools & Notions
10mm black (x2)
approximately 50g
minimum 3 (one per active section)
(for tracking round starts)
(6-strand, for nose and mouth)
(for positioning pieces before joining)
(optional, for rosy cheeks)
(optional, for extra eye security)
(digital or manual, highly recommended)
— Gauge:
18 sc = 4 inches
— Finished Size:
~15 cm tall
— Yarn Weight:
Worsted
— Hook:
3.5mm
— Terms:
US Crochet Terminology
— Cost:
FREE ✓
Crochet Abbreviations
Horse Pattern — Full Pattern
🧶Pattern
Assembly & Finishing Tips
💡 Positioning the Head
When attaching the head to the body, use slip stitches to ensure a secure connection that allows for slight movement, enhancing the Horse's character.
💡 Attaching Ears
Before sewing the ears, pin them into place to visualize their position. This will help you achieve symmetry and create a balanced look.
💡 Leg Alignment
When attaching the legs, make sure they are evenly spaced and aligned with the body to help your Horse stand steadily. Use stitch markers to mark their positions before securing.
💡 Adding the Tail
Secure the tail firmly to the back of the Horse, ensuring it is positioned in a way that complements the overall design. This adds a nice finishing touch.
💡 Embroidering Features
When embroidering the facial features, use a contrasting thread to make the eyes and mouth stand out. This simple detail can elevate the overall appearance of your Horse.
💡 Final Touches
After assembly, double-check all connections and make any necessary adjustments to ensure everything is secure. This is the time to make your Cuddly Horse truly shine before it’s ready for cuddles.
⚠️ Important Notes
- Use stitch markers at the start of every round — don't rely on memory to count.
- Work with consistent tension throughout. Gauge swatch before starting if in doubt.
- Fasten off leaving long tails for sewing — at least 30cm for each piece you'll need to attach.
- Pin and check positioning of all pieces before sewing any of them permanently.
Beginner's Guide to Amigurumi 🌱
Amigurumi is a delightful form of crochet that involves creating small, stuffed animals, such as this Cuddly Horse. The charm of amigurumi lies in its ability to turn simple yarn into adorable creatures through a series of stitches and techniques. This Horse pattern will introduce you to fundamental skills while allowing you to create a cherished toy.
The magic ring is the starting point for your Horse's head, allowing for a tight closure that prevents gaps in your work. This technique sets the foundation for the shape of the head, ensuring it is rounded and soft. Understanding how to create the magic ring will enhance your ability to create various amigurumi projects in the future.
Invisible decrease is an essential technique to master for achieving a smooth shape for your Horse. Unlike traditional decreases, this method hides the stitch, providing a cleaner finish that is crucial for the aesthetic of your amigurumi. This technique will be used throughout your pattern, especially in shaping the head and body to create a polished look.
Tension is vital when crocheting your Horse; it affects the overall appearance and durability of your finished piece. Use a hook size that complements your yarn choice to maintain the correct tension. Practicing with your yarn will help ensure consistency, preventing gaps and ensuring your Horse has a sturdy structure.
The finished Horse Pattern — ready to gift or display
You Ask, We Answer ❓
Yes, this is a free crochet pattern available for you to enjoy.
Yes, you can sell the finished Horse, but please credit our pattern.
The ideal yarn for this Horse is a soft, worsted-weight yarn that provides a cuddly texture, such as Lion Brand Pound of Love.
Pin the ears in place before sewing to ensure they are balanced and aligned, giving your Horse a polished look.
Your finished Horse will be approximately 15 cm tall, making it a lovely size for cuddling or display.
This Cuddly Horse makes an excellent gift for baby showers, birthdays, or as a comforting toy for children, spreading joy on any occasion.

