Patches the Haunted Rag Doll Amigurumi — Free Crochet Pattern
Intermediate
For crocheters comfortable with the basics, ready to try new shaping and assembly techniques
Single-Day Project
A satisfying project you can complete in a single afternoon or evening.
Handmade Gift
A beautiful keepsake — free forever. Read online or print at home.
About This Patches the Haunted Rag Doll Amigurumi — Free Crochet Pattern
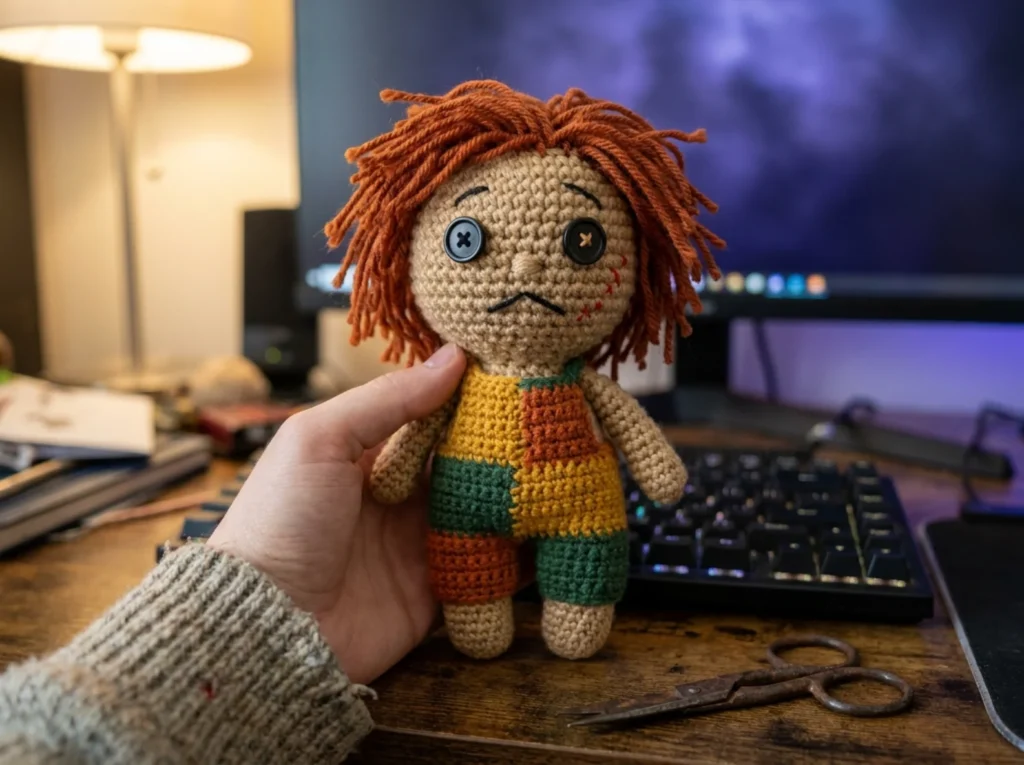
Welcome to Patches — a little haunted-looking rag doll amigurumi built around a patchwork body in mustard, burnt orange, and dark green, a mismatched button-eye stare, and a mane of messy loop-fringe hair. It’s an original character design, not tied to any movie or franchise — just a classic “creepy vintage doll” look built with two genuinely new crochet techniques worth learning.
Finished, it stands about 11cm tall, small enough for a Halloween shelf display, a spooky-season photo prop, or a slightly unsettling gift for someone who likes their cute things with an edge.
Most patchwork amigurumi get their patches from separate pieces of fabric or felt, glued or sewn on after the crocheted body is finished. This pattern builds the four-patch look directly into the single crochet rounds instead — you switch yarn colour partway through a round rather than at the start, and keep that same split point stacked round after round. No appliqué, no fabric glue, just stitch counts. It’s a genuinely useful technique to learn beyond this one doll — the same “mid-round colour split” trick works for any amigurumi where you want a clean colour block instead of a full intarsia chart.
The hair uses a second technique: cut lengths of yarn, folded and knotted through the head stitches one at a time, the same method used for rug and blanket fringe. It’s an easy way to add real dimensional hair, fur, or a mane to any future amigurumi project, and it’s far more forgiving than trying to embroider hair strand by strand.
What’s inside
- Full materials list with suggested colors and quantities
- Every stitch explained with a full stitch key
- Round-by-round instructions for the head, color-block body, arms, and legs
- The seamless color-split technique, explained round by round
- The loop-fringe hair technique, step by step
- Face embroidery guidance for the eyes, brows, frown, and scar detail
- Step-by-step assembly instructions
Who this is for
Crocheters who’ve made a basic amigurumi shape before and want to pick up two genuinely new techniques — colour-blocking without intarsia, and knotted fringe hair — without a complicated project wrapped around them. Also a solid one-to-two-evening seasonal make.
Instant PDF-style pattern, free forever — no login, no email required. Read it on your phone, tablet, or print it out, whichever you crochet best with. 🧵
Starting rounds — magic ring and first increases
Why You'll Love This Pattern 💛
01: A real construction technique, not just decoration — the four-patch body colour isn't sewn-on felt or embroidered on afterward, it's built directly into the stitches as you go. 02: Beginner-friendly colourwork — you're never juggling more than two strands at once, and there's no tapestry crochet chart to follow, just a stitch-count split point per round. 03: The fringe hair technique is reusable — once you've learned the loop-and-knot method here, you can use it on literally any future amigurumi that needs hair, a mane, or fur texture. 04: Every "flaw" is part of the character — the mismatched patches, the off-centre X eye, the uneven fringe are all supposed to look a little imperfect, so there's no pressure to make it look factory-made. 05: Small and quick — under 30g of stuffing total means this works up in an evening or two, good for using up leftover worsted scraps in your stash.
Shaping with increases — building the body
Switch Things Up 🎨
01: Change the patch colours — try purples and greys for a more ghostly look, or reds and blacks for a higher-contrast horror feel. The technique works with any two-colour-per-round split. 02: Add a third body colour by splitting rnds 5-7 with its own colour change too, for a six-patch body instead of four. 03: Swap the button-X eye for two matching plain buttons if you want a sadder/sleepier look instead of the unsettling mismatched-eye effect. 04: Make the hair a solid colour and trim it all to one even length for a neater, less "haunted" version of the same doll. 05: Skip the scar embroidery and the eye X entirely to turn this into a plain, friendly patchwork doll pattern — same construction, completely different mood. 06: Go up to a 5mm hook and thicker yarn to make an oversized cuddle-size version — just add 1-2 extra increase rounds to the head and body before working even.
Colour variations — personalise your make
Common Mistakes & How to Fix Them 🔧
If your stitch count is off going into rnd 4, the mustard/orange split won't land at the halfway point. Count your stitches before switching colours — 9 and 9 on an 18-st round, every time.
If you pull the unused colour too tight when carrying it inside the work, it can pucker the fabric and peek through. Carry it loosely, following the curve of the round rather than pulling it straight across.
If the fold-and-pull knot isn't pulled fully tight against the head stitch, the strands can work loose over time. Give each knot a firm tug right after you tie it, not just a loose pull-through.
Attach both buttons before you finish stuffing the head, while you can still see and adjust from the front — pin first, check the doll is looking straight ahead, then sew.
This usually means the colour changes are happening at different stitch counts each round instead of stacking on top of each other. Keep your split points vertically aligned round after round for a clean patch line instead of a spiral.
Assembly stage — pinning pieces before sewing
Materials Needed for Patches the Haunted Rag Doll Amigurumi — Free Crochet Pattern
🧶YARN
Worsted (medium, Category 4) yarn in tan/beige (~20g), for the head, arms, and legs.
small amounts (~8g each) of mustard yellow, burnt orange, and dark green worsted yarn, for the seamless color-block body.
burnt-orange or rust worsted yarn (~10g), cut into loops for the fringe hair.
🪝TOOLS & NOTIONS
3.5mm, or a size appropriate for your yarn. Go down a size for tighter, more even stitches.
two black buttons (12mm) work best here since one gets a stitched X over it.
black, for the brows, frown, and eye X; red, for the small cheek scar marks.
about 25g, enough for a firm head and body that hold their shape.
blunt-tipped, for sewing pieces together, embroidery, and weaving in ends.
or a small safety pin, to mark round starts and color-change points.
small, sharp embroidery scissors, useful for trimming both yarn tails and the fringe hair to length.
— Gauge:
18 sc = 4 inches in sc
— Finished Size:
~11 cm tall
— Yarn Weight:
Worsted
— Hook:
3.5mm
— Terms:
US Crochet Terminology
— Cost:
FREE ✓
Crochet Abbreviations
Patches the Haunted Rag Doll Amigurumi — Free Crochet Pattern — Full Pattern
🧶HEAD (make 1, skin colour)
🧶BODY — seamless color-block (make 1)
🧶ARMS (make 2, skin colour)
🧶LEGS (make 2)
🧶ASSEMBLY
🧶HAIR — loop-fringe technique
Assembly & Finishing Tips
💡 Weaving in ends
Use a tapestry needle to weave each tail back and forth through at least 5–6 stitches in different directions. A tiny dot of washable glue on the final stitch before trimming adds extra security for toys used by children.
💡 Sewing pieces together
Pin each piece firmly to the body before sewing. Use mattress stitch for the most invisible join — insert the needle under the same yarn bar on alternating pieces and pull firmly. Knot securely at start and end, weave both tails deep into the body.
💡 Positioning safety eyes
Take time here — eye spacing determines the character's entire personality. Closer eyes look more intense; further apart looks more friendly and playful. Pin both positions and step back before snapping the backs on permanently. Once snapped, eyes cannot be moved without damaging the fabric.
💡 Blocking
Not required for amigurumi, but lightly steam-blocking any warped pieces will relax the fibres. Hold a steam iron a few centimetres away — never let it touch the stuffing or safety eyes directly.
💡 Care instructions
Handwash in cool water with mild detergent, press gently to remove excess water, lay flat to dry. Many acrylic yarns are machine washable on a gentle cycle in a laundry bag — always check your yarn label.
⚠️ Important Notes
- Use stitch markers at the start of every round — don't rely on memory to count.
- Work with consistent tension throughout. Gauge swatch before starting if in doubt.
- Fasten off leaving long tails for sewing — at least 30cm for each piece you'll need to attach.
- Pin and check positioning of all pieces before sewing any of them permanently.
Beginner's Guide to Amigurumi 🌱
Amigurumi (Japanese: ami = knitted/crocheted + nuigurumi = stuffed toy) is the craft of making small crocheted characters. You start with a magic ring, work in continuous spiral rounds of single crochet, and shape the piece through increases and decreases — no seams, no joins, no turning.
The magic ring creates a closable centre with no hole. Wrap yarn around two fingers, insert the hook, yarn over and pull through. Work your first round into this ring, then pull the tail to close tight. Practise a few times — it becomes effortless quickly.
The invisible decrease — insert your hook through the front loop only of the first stitch, then the front loop only of the second stitch. Yarn over, pull through both loops, then yarn over again and pull through the remaining two. Working through front loops only makes the decrease blend into the fabric instead of leaving a bump.
Tension matters most. Amigurumi needs tight, firm tension so stuffing can't show through. If you can see white fiberfill peeking between your stitches, go down one hook size. The fabric should feel dense and firm — like a tightly woven canvas, not a loose net.
The finished Patches the Haunted Rag Doll Amigurumi — Free Crochet Pattern — ready to gift or display
You Ask, We Answer ❓
Completely and permanently free — no login, no email, no payment. Read online, print, or save to your phone. The only ask: don't redistribute or resell the written pattern itself.
Yes — you're welcome to sell handmade finished items crocheted from this pattern. Please credit Cozy Amigurumi as the pattern source when sharing online.
It builds the patchwork look directly into the single crochet rounds by switching yarn colour partway through a round instead of at the start, so no sewing or appliqué is needed to get the four-patch effect.
No — you're never working with more than two colours in the same round, and you're not following a picture chart. It's just a stitch-count split point, much simpler than true colourwork.
Yes, though buttons are recommended here since one eye needs a stitched X sewn across it afterward, which is easier to do neatly on a flat button than a rounded safety eye.
Trim in stages rather than all at once — cut a little, check how it sits, then cut more. Uneven length is intentional, but you can always take more off; you can't add length back.
It's better as a second or third project — the color-block body assumes you're already comfortable with basic single crochet in the round, so you can focus on the colour-switching technique itself.