Royal Blue Checkerboard Filet Crochet Table Runner — Free Crochet Pattern
Advanced
For experienced crocheters who enjoy complex shaping, fine detail, and ambitious construction
Single-Day Project
A satisfying project you can complete in a single afternoon or evening.
Handmade Gift
A beautiful keepsake — free forever. Read online or print at home.
About This Royal Blue Checkerboard Filet Crochet Table Runner — Free Crochet Pattern
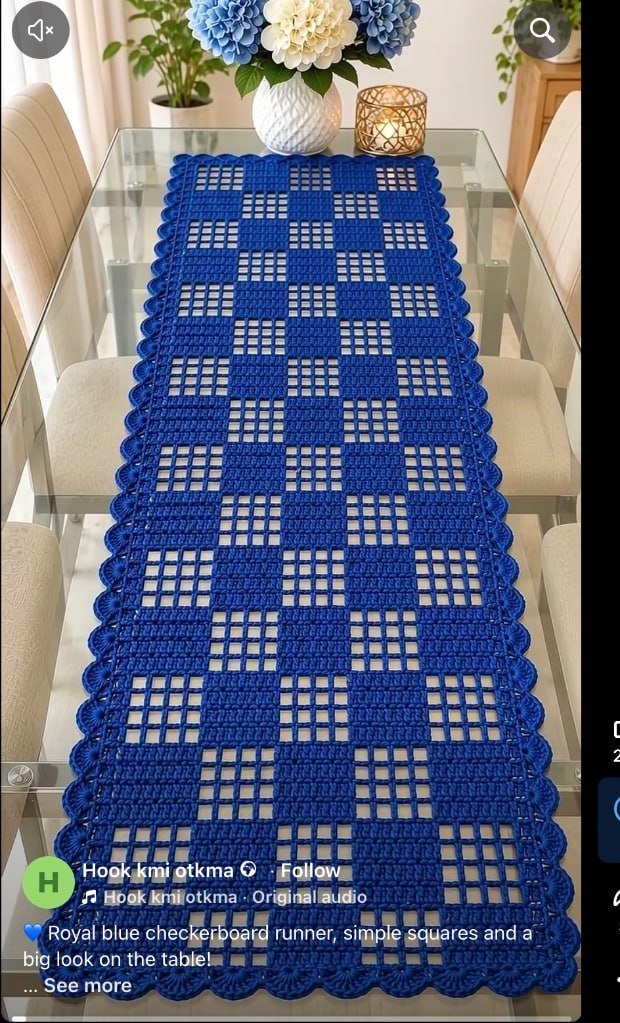
If you are looking to elevate your dining decor with timeless elegance, this comprehensive guide provides everything you need to create a striking Royal Blue checkerboard filet crochet table runner. Designed for experienced crocheters who appreciate architectural symmetry and precise geometry, this piece transforms traditional filet mesh into a modern, high-contrast visual statement. The deep, vibrant hue of the mercerized cotton catches the light along every alternating solid block and open mesh square, creating a luxurious textural interplay. Built from the bottom up with reinforced selvedges and a seamless structural border, this project offers an engaging multi-hour journey into advanced thread and yarn manipulation. Whether styling a rustic farmhouse dining table or a sleek contemporary glass surface, this runner delivers heirloom-quality craftsmanship that commands attention.
The construction methodology relies on the precise grid mechanics of classic filet crochet, where solid blocks of double crochets pair with open mesh squares formed by chains and skipped stitches. By carefully charting a balanced checkerboard layout, the design achieves a rhythmic balance between dense textile weight and airy geometric transparency. Every transition is engineered to maintain crisp, unblunted corners and a uniform side tension that prevents the characteristic inward bowing common in long rectangular runners. The rich Royal Blue colorway serves as an extraordinary vehicle for this technique, casting deep shadows within the open mesh loops while highlighting the crisp vertical posts of every double crochet. You will explore advanced tension control, strategic turning chain placement, and seamless border integration that locks your final dimensions into place.
Mastering this pattern requires careful attention to row-by-row charting, stitch multiplication rules, and foundation stability. We will walk through the exact mathematical ratios required to scale your mesh grid, manage multiple working threads during border transitions, and execute flawless blocking. The resulting textile is remarkably durable, washable, and designed to drape effortlessly over table edges with clean, weighted corners. You will find exhaustive row instructions, detailed technical breakdowns, and troubleshooting strategies designed to eliminate common filet pitfalls such as wandering side edges or uneven block widths. Prepare your workspace, gather your high-grade mercerized cotton, and immerse yourself in an advanced crochet masterclass that yields a breathtaking centerpiece for your home.
Throughout this tutorial, every single row is documented with exact stitch counts, structural notes, and alignment checks to ensure absolute symmetry from start to finish. You will learn how to read schematic grids translated into written instructions, how to maintain immaculate stitch definition using sport-weight cotton, and how to finish your piece with professional blocking techniques. Advanced techniques like stacked starting double crochets and invisible joining methods are integrated directly into the workflow to elevate your finished result beyond standard handmade decor. Dive into the detailed sections below, where every technical nuance is laid bare for the dedicated artisan seeking perfection in every loop and chain.
This pattern is meticulously structured for makers who love the meditative rhythm of gridwork combined with the striking visual impact of geometric design. As you progress from the foundational chain rows through the expansive checkerboard field and into the polished picot-accented border, you will witness a masterclass in modern textile engineering. Bookmark this guide, keep your stitch markers close, and enjoy crafting a showstopping dining accessory that will be admired for generations. Let us explore the technical specifications and embark on creating your new favorite heirloom project.
At a Glance
- Skill level: Advanced
- Time: 30-40 hours
- Finished size: 42 cm x 145 cm (16.5 in x 57 in)
- Yarn: Sport weight (2-fine), 100% mercerized cotton, Royal Blue, approx. 1,650 metres (1,805 yards)
- Hook: 3.5 mm (US E/4) crochet hook
- Main technique: Filet crochet gridwork, solid blocks, open mesh, reinforced selvedge margins
- Number of motifs/rows: 1 foundation setup row, 153 main chart rows, 4 border rounds
- Best for: Formal dining room tables, festive holiday console displays, heirloom gifting
Why You’ll Love This Pattern
- Exquisite architectural clarity: The crisp checkerboard grid creates a sophisticated, modern optical rhythm that enhances any tabletop setting.
- No unsightly side skewing: Built-in selvedge stabilization rows ensure your long edges remain perfectly straight without requiring excessive post-blocking intervention.
- Deep saturated color: Premium mercerized cotton reflects light brilliantly, accentuating every individual double crochet post and open mesh void.
- Comprehensive row tracking: Every single row is fully written out with exact stitch counts, eliminating guesswork and chart fatigue.
- Advanced skill expansion: Refine your tension consistency, grid alignment, and clean border integration through professional-grade construction steps.
- Heirloom durability: High-twist mercerized cotton produces a sturdy, washable textile that retains its shape and luster for years of use.
Materials
- Royal Blue Mercerized Cotton (Sport Weight): About 1,650 m (1,805 yd) of 100% mercerized cotton yarn spanning 5 skeins of 330 m eachUsed for the entire foundation, checkerboard body, and structural edging.
- Main Hook: 3.5 mm (US E/4) ergonomic crochet hookUsed for working the entire table runner to maintain consistent tension throughout.
- Alternative Hook: 3.25 mm (US D/3) crochet hookUsed optionally for the initial foundation chain if your starting chains naturally tend to flare or loosen.
- Tapestry Needle: Large-eye bent-tip tapestry needle (Size 18 or 20)Used for weaving in tail ends securely along the dense selvedge tracks.
- Stitch Markers: 10 locking stitch markersUsed for tracking chart repeats, border turning points, and corner pivot stations.
- Precision Scissors: Small embroidery snips with fine micro-tipsUsed for clean, close trimming of yarn tails after securing.
- Measuring Tape: Flexible 150 cm (60 in) fiberglass measuring tapeUsed to verify gauge dimensions during early body progression.
- Blocking Supplies: Interlocking foam blocking mats and rust-resistant T-pinsEssential for setting the geometric squareness and crisp grid edges of the finished runner.
Abbreviations
chchaindcdouble crochet (UK treble crochet)scsingle crochet (UK double crochet)sl stslip stitchspspaceskskipststitchstsstitchesRSright sideWSwrong sideblksolid filet block (4 dc worked over 4 consecutive sts or sps)meshopen filet mesh (ch 2, sk 2 sts, dc in next st)incincreasedecdecreaseSpecial Stitches
Stacked Starting Double Crochet (St-dc): Replaces the traditional turning chain 3 at the beginning of a double crochet row to eliminate gaps and create an immaculate, straight edge. Used at the start of every dc row and block row.
- Do not chain at the start of the row; work a single crochet directly into the very first stitch of the previous row.
- Insert your hook under the left vertical strand of the single crochet you just made.
- Yarn over and pull up a loop (2 loops on hook).
- Yarn over and pull through both loops to complete the stacked starting double crochet.
Extended Filet Block (Ext-Blk): A 4-stitch solid block sequence where intermediate spaces are bridged with exact tension locking. Used throughout the core checkerboard grid sections.
- Work 1 double crochet into the designated starting stitch.
- Work 1 double crochet into each of the next 2 stitches or chain spaces.
- Work 1 final double crochet into the fourth stitch, ensuring the post aligns vertically with the mesh grid below.
Understanding the Construction
The Royal Blue checkerboard filet crochet table runner is engineered from a single bottom-up directional workflow, beginning with a robust foundation chain and selvedge margin. Filet crochet relies on a grid system where each “block” consists of four double crochets (or two double crochets separated by filled space) and each “mesh” consists of two skipped stitches bridged by a two-chain space. By alternating blocks and meshes according to a strict mathematical matrix, the runner builds its iconic checkered motif without requiring color changes or complex multi-yarn management. The secret to this specific design lies in its reinforced 3-stitch selvedge borders on both the left and right margins, which act as architectural anchor pillars to prevent edge curling and maintain strict rectangular geometry.
As you progress upward through the 153 grid rows, tension discipline is paramount. Sport-weight mercerized cotton has minimal natural elasticity, meaning any variation in your chain-2 spaces or double crochet height will immediately show up as distortion in the grid squares. To counteract this, maintain an even rhythm and utilize the Stacked Starting Double Crochet method rather than turning chains, ensuring your outer perimeter remains completely flush. The checkerboard pattern shifts symmetrically every 6 rows, creating a balanced optical rhythm that draws the eye smoothly along the entire 145-centimeter length of the runner. Strategic placement of locking stitch markers every 20 rows will keep your count accurate and prevent alignment drift.
The final phase involves a four-round perimeter border that encapsulates the entire runner in a clean frame of double crochets and delicate picot accents at the corners. This border not only seals the raw turning edges of the filet mesh grid but also adds structural weight, helping the runner drape gracefully over the ends of your furniture. Proper blocking at the conclusion is not optional; it is the vital finishing step that relaxes the mercerized cotton fibers and locks the grid squares into razor-sharp geometric alignment. Take your time pinning out each corner to exact right angles, and your finished piece will showcase professional-grade execution from every angle.
Gauge and Finished Size
Gauge is critical for this project to ensure your yarn quantities are sufficient and your finished runner matches the intended dimensions. The required gauge is 11 filet blocks by 11 rows equals 10 cm x 10 cm (4 in x 4 in) measured over the blocked checkerboard grid using a 3.5 mm hook. To check your gauge, work a swatch of 15 blocks wide by 15 rows high, wash it gently, pin it out to dimensions on blocking mats, and allow it to dry completely before measuring the central 10 cm square.
If your gauge swatch has too many stitches or blocks per 10 cm (meaning your swatch is too small), your tension is too tight; switch up to a 3.75 mm hook or consciously relax your yarn pull. If your swatch has fewer blocks per 10 cm (meaning your swatch is too large), your tension is too loose; switch down to a 3.25 mm hook. Following this gauge precisely ensures your finished runner attains a final size of approximately 42 cm in width by 145 cm in length, perfectly proportioned for standard dining and console tables.
Pattern Notes
- The table runner is worked flat in rows from the bottom selvedge up to the top selvedge, followed by a continuous working border around the entire outer perimeter.
- Unless explicitly stated otherwise, turning chains (such as St-dc) do not count as stitches; always work your first stitch of the row into the very base of your starting maneuver.
- Solid blocks (blk) consist of 4 consecutive double crochets (when following an existing block) or 2 dc in ch-2 sp plus 1 dc in each surrounding dc.
- Open mesh (mesh) consists of ch 2, sk 2 sts (or sk ch-2 sp), and dc in the next dc.
- Right Side (RS) rows read from right to left on the chart; Wrong Side (WS) rows read from left to right. Maintain consistent viewing orientation.
- Place locking stitch markers every 25 rows along the outer left margin to easily verify your running row count without unrolling the entire piece.
- Always work your final double crochet of any row into the top of the turning mechanism of the previous row to maintain vertical edge integrity.
- Weave in all yarn tails immediately as you finish skeins by running them back and forth through the dense double crochet posts of the selvedge margin.
Instructions
Part 1: Foundation and Lower Border
Using your 3.5 mm hook and Royal Blue mercerized cotton, work a stable foundation chain that establishes the exact width of the runner including selvedge margins.
- Row 1 (RS): Ch 147, working into the back bump of the foundation chain, dc in 4th ch from hook (skipped 3 chs count as first dc and 1 ch sp of first mesh), *ch 2, sk 2 ch, dc in next ch; repeat from * across to last ch, turn. (48 mesh spaces total including selvedges)
- Row 2 (WS): St-dc in first dc, dc in next 2 chs, dc in next dc (left selvedge block established), *ch 2, sk 2 sts, dc in next dc; repeat from * across to last 3 mesh units, work solid block over next 3 mesh units (9 dc), dc in final turning ch, turn. (44 sts in blocks, 4 mesh units)
- Row 3 (RS): St-dc in first dc, work solid block over next block, *ch 2, sk 2 sts, dc in next dc; repeat from * across to last 4 sts, work solid block over final block, dc in top of turning st, turn. (48 sts)
- Row 4 (WS): Repeat Row 3 exactly to maintain selvedge continuity and establish the lower border band. (48 sts)
- Row 5 (RS): St-dc in first dc, work 1 mesh over the solid block, *ch 2, sk 2 sts, dc in next dc; repeat from * across to last 4 sts, work 1 mesh, dc in top of turning st, turn. (48 sts)
Part 2: The Royal Blue Checkerboard Filet Crochet Table Runner Core Grid
Working the primary checkerboard field using alternating blocks and open mesh squares in Royal Blue cotton, establishing the signature geometric motif.
- Row 6 (WS): St-dc in first dc, work solid block over selvedge, [ch 2, sk 2 sts, dc in next dc] 3 times, [solid block over next mesh space, dc in next dc] 3 times, [ch 2, sk 2 sts, dc in next dc] 6 times; repeat checkerboard sequence across to last 13 sts, mirror the sequence, work solid block over final selvedge, turn. (48 sts)
- Row 7 (RS): St-dc in first dc, work solid block over selvedge, [ch 2, sk 2 sts, dc in next dc] 2 times, solid block over next block, [ch 2, sk 2 sts, dc in next dc] 4 times, solid block over next block; repeat across, maintaining grid alignment, finish with solid block selvedge, turn. (48 sts)
- Row 8 (WS): St-dc in first dc, work solid block over selvedge, [solid block, ch 2, sk 2 sts, dc in next dc] alternating across the core grid until 4 sts remain, work solid block selvedge, turn. (48 sts)
- Row 9 (RS): St-dc in first dc, work mesh over selvedge block, [ch 2, sk 2 sts, dc in next dc] across grid interior, finish with mesh over final block, dc in turning st, turn. (48 sts)
- Row 10 (WS): Repeat Row 8 to reinforce the alternating block shift across the checkerboard matrix. (48 sts)
- Row 11 (RS): St-dc in first dc, work solid block over selvedge, [solid block over mesh, ch 2, sk 2 sts, dc in next dc] repeating across to last 4 sts, work solid block selvedge, turn. (48 sts)
- Row 12 (WS): Repeat Row 7 to maintain symmetry in the checkerboard module sequence. (48 sts)
- Row 13 (RS): St-dc in first dc, work mesh over selvedge block, [solid block, ch 2, sk 2 sts, dc in next dc] across grid, finish with mesh over final block, turn. (48 sts)
- Row 14 (WS): Repeat Row 6, ensuring all block posts stack directly above previous rows. (48 sts)
- Row 15 (RS): St-dc in first dc, work solid block over selvedge, [ch 2, sk 2 sts, dc in next dc] 5 times, solid block over next block, [ch 2, sk 2 sts, dc in next dc] 3 times; repeat across, finish with solid block selvedge, turn. (48 sts)
- Row 16 (WS): Repeat Row 8 with adjusted offset for module transition. (48 sts)
- Row 17 (RS): St-dc in first dc, work mesh over selvedge, [solid block over mesh, ch 2, sk 2 sts, dc in next dc] across interior grid, finish with mesh, turn. (48 sts)
- Row 18 (WS): Repeat Row 11 to continue the central checkerboard expansion. (48 sts)
- Row 19 (RS): St-dc in first dc, work solid block over selvedge, [ch 2, sk 2 sts, dc in next dc] across core grid, finish with solid block selvedge, turn. (48 sts)
- Row 20 (WS): Repeat Row 7 to solidify the structural motif repeat block. (48 sts)
- Rows 21 to 140: Repeat the 15-row module sequence (Rows 6 through 20) eight consecutive times, maintaining identical stitch counts and verifying grid alignment every 15 rows with locking markers. (48 sts per row)
- Row 141 (RS): St-dc in first dc, work mesh over selvedge, [ch 2, sk 2 sts, dc in next dc] across interior grid, finish with mesh, turn. (48 sts)
- Row 142 (WS): St-dc in first dc, work solid block over selvedge, [solid block, ch 2, sk 2 sts, dc in next dc] across, finish with solid block selvedge, turn. (48 sts)
- Row 143 (RS): Repeat Row 141. (48 sts)
- Row 144 (WS): Repeat Row 142. (48 sts)
- Row 145 (RS): St-dc in first dc, work solid block over selvedge, [ch 2, sk 2 sts, dc in next dc] across to final 4 sts, work solid block selvedge, turn. (48 sts)
Part 3: Upper Border and Finishing Edges
Working the concluding rows that mirror the lower foundation border to frame the checkerboard core perfectly.
- Row 146 (WS): St-dc in first dc, work solid block over selvedge, work solid block over next 3 mesh units, [ch 2, sk 2 sts, dc in next dc] across core grid to last 13 sts, work solid block over next 3 mesh units, dc in final turning ch, turn. (48 sts)
- Row 147 (RS): St-dc in first dc, work solid block over selvedge, [ch 2, sk 2 sts, dc in next dc] across to last 4 sts, work solid block selvedge, turn. (48 sts)
- Row 148 (WS): Repeat Row 147 exactly to reinforce upper border density. (48 sts)
- Row 149 (RS): St-dc in first dc, work 1 mesh over solid block, [ch 2, sk 2 sts, dc in next dc] across to last 4 sts, work 1 mesh over block, dc in turning st, turn. (48 sts)
- Row 150 (WS): St-dc in first dc, work solid block over selvedge, work mesh across interior, work solid block over final selvedge, turn. (48 sts)
- Row 151 (RS): St-dc in first dc, work solid block over selvedge, dc in every st and ch sp across entire row to final block, work solid block selvedge, fastens off with a long tail for border integration. (48 sts)
Assembly
Because this table runner is crafted as a single continuous piece from bottom to top, traditional multi-motif assembly is not required. However, edge squaring and perimeter stabilization are executed during this phase to prepare the runner for final framing.
- Lay the completed runner flat on a clean surface, inspecting all side selvedges for any loose loops or uneven tension points.
- Thread your tapestry needle with a 30 cm length of Royal Blue cotton and secure any minor floating ends along the interior grid junctions by weaving them invisibly through double crochet posts.
- Verify that both the lower foundation edge and upper finishing edge measure identical widths, adjusting any slight variances with your fingers.
- Position locking stitch markers at all four exact 90-degree corners of the runner to prepare for uniform border distribution.
Border and Finishing
- Round 1 (RS): Join Royal Blue cotton with a standing sc in any corner stitch, work (1 sc, ch 2, 1 sc) in the exact same corner st to form a turning pivot, *work evenly spaced sc down the side edge (approx. 1 sc per row end), work (1 sc, ch 2, 1 sc) in the corner st*; repeat from * around the entire perimeter of the runner, join with a sl st to first sc, turn. (approx. 400 sc total)
- Round 2: St-dc in first sc, work 1 dc in each sc around the entire runner, working (2 dc, ch 2, 2 dc) in each corner ch-2 space, join with a sl st to top of starting st, turn. (416 dc)
- Round 3: Sl st into next 2 dc, *work [2 dc, ch 3, sl st in 3rd ch from hook (picot), 2 dc] in corner ch-2 sp, sk 2 dc, sc in next dc, [ch 3, sk 2 dc, sc in next dc] across side edge*; repeat from * around all four sides, join with a sl st to base of first corner cluster.
- Round 4 (Finishing Edges): Fasten off all working yarns, leaving 15 cm tails. Thread your tapestry needle and weave all remaining ends securely back and forth through the dense inner core of the border stitches.
- Blocking: Submerge the finished runner in lukewarm water with a mild wool/cotton wash for 20 minutes. Gently press out excess water in a clean towel without wringing. Pin the runner out flat on blocking mats, using a measuring tape and T-pins to ensure absolute rectangular symmetry, sharp 90-degree corners, and straight edge margins. Allow to dry completely before unpinning.
Yarn Substitution Guide
- DK Weight 100% Bamboo Blend (e.g., Bamboo Cotton DK): Requires a 4.0 mm hook; creates a silkier drape with a heavier, more luxurious downward fall on table ends.
- Sport Weight Mercerized Egyptian Cotton (e.g., Scheepjes Catona Equivalent): Requires a 3.25 mm hook; produces ultra-crisp stitch definition and a brilliant sheen, though project takes slightly longer.
- Worsted Weight 100% Cotton (e.g., Lily Sugar’n Cream): Requires a 4.5 mm hook; yields a thicker, highly robust, casual farmhouse-style runner that is exceptionally durable for daily family dining.
- 3-Ply Crochet Thread Size 3 (e.g., Aunt Lydia’s Fashion 3): Requires a 2.75 mm hook; transforms the runner into a delicate, heirloom lace centerpiece with intricate, highly refined mesh squares.
- Recycled Cotton Cord (2mm): Requires a 5.0 mm hook; produces a rigid, modern architectural mat that holds its shape without heavy blocking, ideal for minimalist modern interiors.
Troubleshooting by Round
- Row 1 — Foundation chain curling: If your starting chain pulls tight and curves like a crescent, frog the row and switch to the 3.25 mm hook for the foundation chain only, or insert your hook into the back bump more loosely.
- Rows 6-20 — Side edges wandering inward: If your stitch count remains 48 but your width shrinks in the middle, you are pulling your chain-2 spaces too tightly; consciously lengthen the loop of your chains across mesh spaces.
- Row 73 — Misaligned checkerboard block: If a solid block lands over a mesh space instead of a dc post, frog back to the start of the 15-row module repeat and verify your offset count against the previous block.
- Row 151 — Wavy upper finishing edge: If the final solid double crochet row flares outward, you worked too many stitches into the turning spaces; ensure you are skipping exactly 2 stitches under each mesh opening.
- Border Round 1 — Ruffling along side edges: If your sc stitches cause the side margins to wave, you have worked too many stitches into the row ends; reduce your frequency to exactly 1 sc per row end plus 1 sc in the dip between rows.
- Border Round 3 — Curling corners: If the corners cup upward instead of lying flat, your corner ch-3 picot clusters lack sufficient ease; add an extra chain stitch to the corner turning space.
- Blocking Phase — Skewed parallelogram shape: If your pinned runner refuses to form a true rectangle, your starting chain tension differed from your ending tension; re-wet the piece and adjust tension distribution using diagonal T-pins.
- General — Splitting cotton yarn: If your 3.5 mm hook continually catches individual plies of the sport-weight cotton, switch to an inline-style crochet hook with a sharper head point to cleanly pierce loops.
Tips for Success
- Swatch thoroughly: Always complete a full 15×15 block gauge swatch and wash it before starting the main runner to guarantee your yardage will suffice.
- Use stitch markers: Place locking markers every 25 rows along the left selvedge to make counting effortless without unrolling the entire length.
- Maintain consistent posture: Filet crochet is sensitive to hand tension shifts; crochet in good lighting and take short breaks to keep your grip pressure stable.
- Block meticulously: Do not skip the wet blocking stage; it is what transforms a handmade textile into a professional heirloom-quality decor piece.
- Wind center-pull cakes: Wind your sport-weight cotton skeins into center-pull yarn cakes before starting to prevent tangling and tension disruption.
- Count your mesh blocks: Check your total block count (48 units per standard row) at the end of every single row to catch dropped stitches immediately.
- Anchor your tails: Weave yarn tails through at least 5 cm of dense double crochet posts to ensure they never wiggle loose during laundering.
- Protect your work: Keep your runner covered when resting between sessions to prevent dust or pet hair from clinging to the mercerized cotton fibers.
Common Mistakes to Avoid
- Skipping the turning chain equivalent: Using traditional chain-3 turning loops instead of Stacked Starting Double Crochets leaves unsightly gaps along your outer margins.
- Working into chain spaces incorrectly: Working stitches around the chain space rather than directly into the chain loops causes stitches to slide and distort your grid.
- Ignoring gauge requirements: Failing to check gauge often results in running out of yarn before reaching Row 153 or ending up with a runner that is too short.
- Rushing the blocking process: Unpinning your runner before it is 100% bone dry will cause the mercerized cotton to spring back into its distorted pre-blocked shape.
- Inconsistent chain-2 tension: Making your mesh chains tighter than your double crochet posts causes the entire grid to pucker and pinch inward like an hourglass.
- Skipping row verification: Assuming your pattern count is correct without counting rows leads to asymmetric checkerboard motifs near the upper border.
Ways to Customize This Pattern
- Monochrome Classic White: Substitute the Royal Blue yarn for crisp optical white mercerized cotton for a timeless, bridal-inspired heirloom dining runner.
- Rich Emerald & Gold: Swap the Royal Blue for deep emerald green cotton and add metallic gold embroidery floss highlights along the final border picots.
- Two-Tone Color Blocking: Work the lower 76 rows in Royal Blue and transition seamlessly to pristine silver-grey cotton for the upper 77 rows and border.
- Matching Console Runner: Scale down the foundation chain to 87 stitches to create a shorter 80 cm matching side table or entryway console runner.
- Coordinating Dining Placemats: Use the 15-row checkerboard module to create a set of four matching 35 cm x 45 cm dining placemats with identical border finishes.
- Holiday Festive Red: Switch to rich cranberry red cotton and pair with metallic silver thread for a stunning winter holiday dining table centerpiece.
Care and Washing
To preserve the vibrant luster and crisp geometry of your handmade Royal Blue table runner, hand washing in cool water with a gentle, pH-neutral detergent is highly recommended. Avoid harsh bleaching agents or optical brighteners that can dull the rich saturation of the mercerized cotton fibers over time.
After washing, gently roll the runner in a clean terry cloth towel to press out excess moisture without wringing or twisting the delicate filet mesh grid. Reshape the piece carefully while damp and lay it flat on a padded surface or blocking board away from direct sunlight to air dry completely.
Styling and Display Ideas
This striking table runner serves as a versatile focal point that enhances multiple living spaces and seasonal occasions with effortless sophistication.
- Formal Dining Table Centerpiece: Center the runner down a dark wood dining table, topped with a minimalist ceramic vase and fresh white florals to make the Royal Blue pop.
- Console Table Accent: Drape the runner across an entryway console table paired with a polished brass tray and a signature scented candle.
- Holiday Table Styling: Pair the Royal Blue runner with silver charger plates and crystal glassware during winter evening dinner parties for dramatic contrast.
- Coffee Table Layering: Lay the runner diagonally across a large rectangular wooden coffee table to break up hard geometric lines with soft textile texture.
- Photography and Flat Lays: Use the crisp grid lines as a stylish textural backdrop for photographing food dishes, handmade crafts, or curated tabletop decor.
Frequently asked questions
Can a beginner make this Royal Blue checkerboard filet crochet table runner?
While the pattern uses fundamental filet crochet techniques like alternating solid blocks and open mesh squares, it is classified as advanced due to the length, strict tension control required across 153 rows, and precise edge stabilization. Beginners with a strong grasp of double crochet and grid reading can succeed if they take their time and use stitch markers.
How much yarn do I need for this exact runner size?
You will need approximately 1,650 metres (1,805 yards) of sport-weight, 100% mercerized cotton yarn, which typically translates to 5 skeins of standard 330-meter balls. Purchasing an extra sixth skein is always recommended to ensure you never run short during the final border rounds.
What is the best yarn fiber for a filet crochet table runner?
100% mercerized cotton is universally considered the gold standard for filet crochet table runners. The mercerization process gives the yarn a beautiful sheen, exceptional tensile strength, and crisp stitch definition that holds its blocked shape firmly without stretching out over time.
How long does it take to crochet this runner?
Depending on your crochet speed and experience level with filet gridwork, this project typically requires between 30 and 40 hours of total working time. Breaking the work into manageable 10-row milestones helps prevent hand fatigue and keeps your tension steady.
Can I adjust the length of the table runner?
Yes, you can easily customize the length by repeating or omitting full 15-row modular pattern blocks in the core grid section. Just remember that altering the total row count will proportionally adjust your final yarn consumption requirements.
Why do my table runner edges curve inward?
Edges usually pull inward when your chain-2 spaces in the open mesh are worked too tightly compared to your double crochet stitches. Consciously lengthening the loop of your chains across mesh spaces or switching to a slightly larger hook for chains will correct this tension imbalance.
Is wet blocking mandatory for this project?
Wet blocking is strongly recommended because mercerized cotton has memory and responds dramatically to water and pins. Blocking relaxes the fibers, squares up the filet mesh boxes, and locks your razor-sharp geometric borders into place permanently.
Can I machine wash the finished runner?
Hand washing in cool water is always safest for handmade cotton table runners to prevent snagging or distortion in delicate mesh areas. If machine washing is necessary, place the runner inside a sturdy mesh laundry bag and use a gentle cycle on low spin.
What hook size works best with sport-weight mercerized cotton?
A 3.5 mm (US E/4) crochet hook is the optimal choice for standard sport-weight mercerized cotton in filet crochet. It provides the ideal balance between fabric drape and crisp, uncompressed square mesh openings.
How do I prevent losing my place in the row count?
Using locking stitch markers every 25 rows along the outer left margin is the most reliable method for tracking your progress. Additionally, checking off each completed row on a printed chart or digital tracker ensures absolute pattern accuracy.
Starting rounds — magic ring and first increases