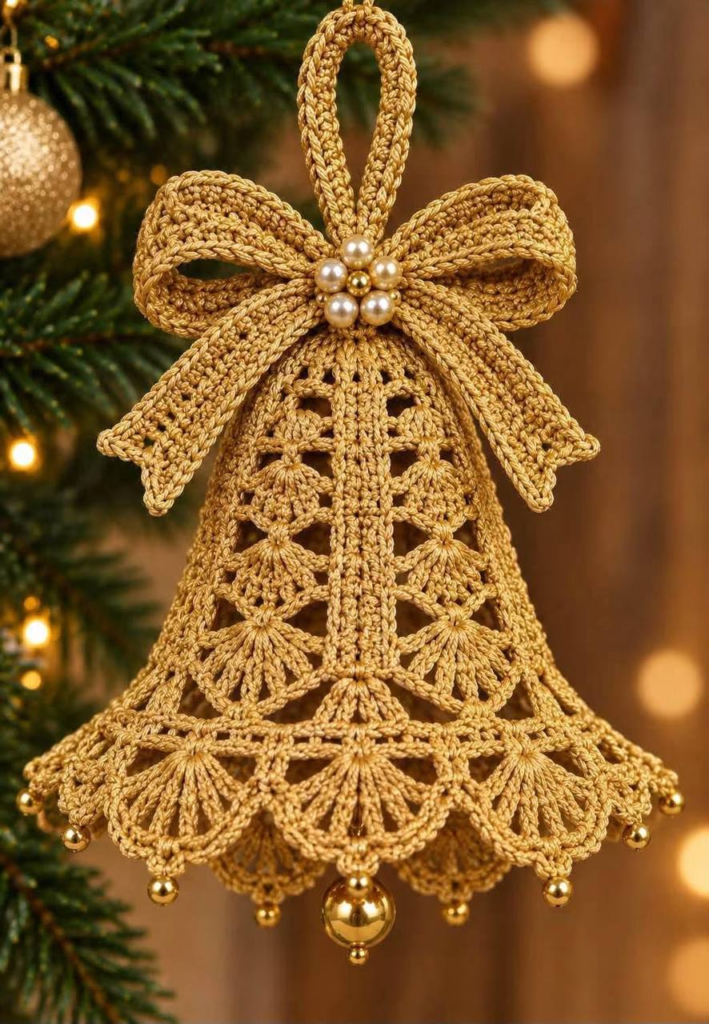
Gold Lace Christmas Bell Ornament with Pearl Bow
Intermediate
For crocheters comfortable with the basics, ready to try new shaping and assembly techniques
Single-Day Project
A satisfying project you can complete in a single afternoon or evening.
Handmade Gift
A beautiful keepsake — free forever. Read online or print at home.
About This Gold Lace Christmas Bell Ornament with Pearl Bow
A golden lace bell with a crocheted bow, a cluster of pearls and tiny gold beads swinging from every scallop. It catches the fairy lights beautifully and makes a lovely handmade gift or a set of heirloom ornaments for your own tree.
About this design
The bell is worked from the top down in rounds: solid ridged columns divide it into lace panels of fan-shell clusters, and the hem flares into a wide scallop band. A small bow is made separately and sewn on with five pearls, and gold beads are added at each scallop point with a large bead as the clapper.
Pro tips for a flawless finish
Use a metallic thread with a cotton core – it holds its shape better than pure metallic. Thread the small beads onto the yarn before the last round so you can slide one into place at each point. Keep the hanging loop tight so the bell hangs straight.
Blocking & finishing
Stiffen the bell with fabric stiffener or a sugar-water mix, then dry it over a small cup or a plastic bell shape so it keeps its flare. Shape the bow loops with a little rolled paper while it dries.
How to style it at home
Hang it on a white or green tree, use a set on a garland, or tie one to a gift box instead of a bow.
Ready to make it?
The full written pattern – materials, round-by-round instructions, abbreviations, FAQ and troubleshooting – is all right here on this page, 100% free. It is an intermediate make: once the first motif is done the rest is pure rhythm, so put on some music and enjoy watching it grow.
Starting rounds — magic ring and first increases
Why You'll Love This Pattern 💛
It is quick, elegant and sparkles on the tree – make a set for your own home and a few to give away.
Shaping with increases — building the body
Switch Things Up 🎨
Silver with white pearls is wintry and modern; red with gold beads is classic Christmas.
Colour variations — personalise your make
Common Mistakes & How to Fix Them 🔧
Not enough increases on Rnds 8–9. Make sure every sp gets a 5-dc fan.
Hanging loop off-centre. Attach it exactly at the top ring.
Use a smooth cotton-core metallic and a slightly larger hook.
Not stiffened. Shape the loops with rolled paper while the stiffener dries.
Assembly stage — pinning pieces before sewing
Materials Needed for Gold Lace Christmas Bell Ornament with Pearl Bow
🪝Tools & Notions
(size 10), approx 25 g
(6 mm), 1 small gold bead, 9 small gold beads (4 mm), 1 large gold bead (12 mm)
— Gauge:
Rnds 1–4 ≈ 4 cm across
— Finished Size:
~12 cm tall
— Yarn Weight:
Metallic gold crochet thread (size 10)
— Hook:
2.0 mm (US 4 steel)
— Terms:
US Crochet Terminology
— Cost:
FREE ✓
Crochet Abbreviations
Gold Lace Christmas Bell Ornament with Pearl Bow — Full Pattern
🧶Pattern
Assembly & Finishing Tips
💡 Weaving in ends
Use a tapestry needle to weave each tail back and forth through at least 5–6 stitches in different directions. A tiny dot of washable glue on the final stitch before trimming adds extra security for toys used by children.
💡 Sewing pieces together
Pin each piece firmly to the body before sewing. Use mattress stitch for the most invisible join — insert the needle under the same yarn bar on alternating pieces and pull firmly. Knot securely at start and end, weave both tails deep into the body.
💡 Positioning safety eyes
Take time here — eye spacing determines the character's entire personality. Closer eyes look more intense; further apart looks more friendly and playful. Pin both positions and step back before snapping the backs on permanently. Once snapped, eyes cannot be moved without damaging the fabric.
💡 Blocking
Not required for amigurumi, but lightly steam-blocking any warped pieces will relax the fibres. Hold a steam iron a few centimetres away — never let it touch the stuffing or safety eyes directly.
💡 Care instructions
Handwash in cool water with mild detergent, press gently to remove excess water, lay flat to dry. Many acrylic yarns are machine washable on a gentle cycle in a laundry bag — always check your yarn label.
⚠️ Important Notes
- Use stitch markers at the start of every round — don't rely on memory to count.
- Work with consistent tension throughout. Gauge swatch before starting if in doubt.
- Fasten off leaving long tails for sewing — at least 30cm for each piece you'll need to attach.
- Pin and check positioning of all pieces before sewing any of them permanently.
Beginner's Guide to Amigurumi 🌱
Amigurumi (Japanese: ami = knitted/crocheted + nuigurumi = stuffed toy) is the craft of making small crocheted characters. You start with a magic ring, work in continuous spiral rounds of single crochet, and shape the piece through increases and decreases — no seams, no joins, no turning.
The magic ring creates a closable centre with no hole. Wrap yarn around two fingers, insert the hook, yarn over and pull through. Work your first round into this ring, then pull the tail to close tight. Practise a few times — it becomes effortless quickly.
The invisible decrease — insert your hook through the front loop only of the first stitch, then the front loop only of the second stitch. Yarn over, pull through both loops, then yarn over again and pull through the remaining two. Working through front loops only makes the decrease blend into the fabric instead of leaving a bump.
Tension matters most. Amigurumi needs tight, firm tension so stuffing can't show through. If you can see white fiberfill peeking between your stitches, go down one hook size. The fabric should feel dense and firm — like a tightly woven canvas, not a loose net.
The finished Gold Lace Christmas Bell Ornament with Pearl Bow — ready to gift or display
You Ask, We Answer ❓
Soak it in fabric stiffener and dry it over a small cup or a plastic bell. It will stay firm for years.
Yes – white, cream or red cotton thread looks lovely too; just add a little shine with gold beads.
Thread them onto the yarn before the last round and slide one up at each scallop point.
If you can work dc and shells, yes. It is small, so it is a great first lace project.
Finished handmade pieces may be sold – please credit Cozy Amigurumi. Do not resell or redistribute the pattern itself.