Red and White Poinsettia Star Flower Bedspread
Advanced
For experienced crocheters who enjoy complex shaping, fine detail, and ambitious construction
Weekend Project
A satisfying weekend make — start Friday, finish Sunday, enjoy forever.
Handmade Gift
A beautiful keepsake — free forever. Read online or print at home.
About This Red and White Poinsettia Star Flower Bedspread
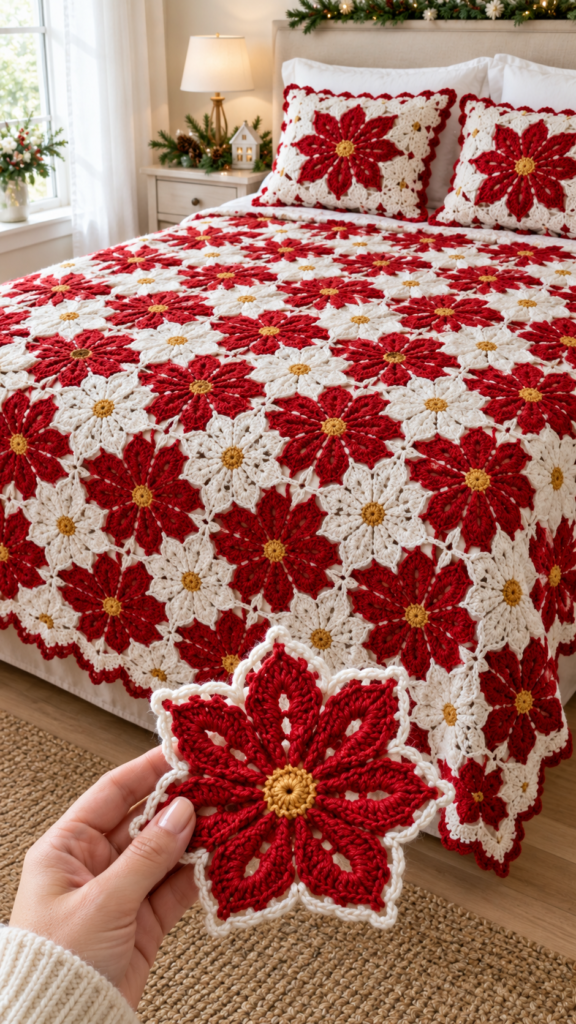
This is the Christmas bedspread people stop and stare at: a field of eight-petal poinsettia stars, red flowers and snow-white flowers set in a checkerboard, every bloom finished with a raised golden centre and an open eyelet down the middle of each petal. A red scalloped border frames the whole thing, and two matching pillow shams with oversized single blooms finish the bed. It is a true heirloom project – written for experienced crocheters who are comfortable reading stitch counts, controlling tension across hundreds of motifs and joining-as-they-go without a seam in sight.
About this design
Every motif starts with a tight golden centre worked in continuous rounds, then grows eight pointed petals from long chain arches. Because each petal is worked over a ch-5 arch rather than into stitches, a natural eyelet opens down its middle – that is the delicate “vein” you can see in the photo. The petals are then caught in a white background round that alternates tall corner points with low side points, squaring the octagonal flower off so the motifs tile perfectly. Two colourways are made: Motif A (red petals) and Motif B (white petals). Laid in a checkerboard, the white petals almost disappear into the background, and the red flowers seem to float on a snowfield – which is exactly the illusion that makes this bedspread look so rich.
Who this pattern is for
This is rated advanced, not because any single stitch is difficult, but because of the discipline the project demands:
- You need rock-solid, repeatable tension – 132 motifs must block to the same 19 cm square.
- You should be comfortable with standing stitches, the invisible join, and join-as-you-go (JAYG) on the final round.
- You will be managing three colours and roughly 800 ends, so a weaving-in strategy is essential (see below).
- You should be able to read a round, predict its stitch count, and catch an error before it compounds.
Yarn & fibre choices
We designed this in DK-weight mercerised cotton. Mercerisation gives the high sheen you see on the petals, crisp stitch definition and colour that will not fade after years of washing. A plain (unmercerised) cotton works but the petals will look flatter. Avoid 100% acrylic for this one – the petal points will not hold a sharp shape after blocking.
Yardage planning. One Motif A uses about 9 g red, 6 g white and 1.5 g gold; one Motif B uses about 15 g white and 1.5 g gold. For a queen layout of 11 x 12 motifs (66 A + 66 B), plus the border and shams, budget roughly 1,000 g red, 1,900 g white and 230 g gold. Always buy the whole quantity of each colour from one dye lot – on a piece this large, a lot change shows as a visible band.
Gauge and sizing maths
Gauge matters more here than in almost any other project. Make one complete Motif A, wet-block it, and measure: it should be 19 cm edge to edge. If it is larger, drop to 3.25 mm; if smaller, go up to 3.75 mm. To resize the bedspread, divide your target width by 19 and round to the nearest whole number. Useful layouts:
- Throw: 7 x 8 motifs (approx. 135 x 155 cm)
- Double: 10 x 11 motifs (approx. 195 x 215 cm)
- Queen: 11 x 12 motifs (approx. 215 x 235 cm)
- King: 13 x 12 motifs (approx. 250 x 235 cm)
Keep the motif count odd in at least one direction so the checkerboard has the same colour at all four corners – it looks far more balanced.
Advanced techniques used
Standing stitches
Every colour change starts with a standing stitch (yarn over the hook, slip knot on hook, work the stitch as normal) instead of a slip stitch and chain. That removes the visible “step” at the join and keeps the petal tips perfectly symmetrical.
The invisible join
At the end of each colour round, cut the yarn, pull it through the last stitch, thread a needle, pass under both loops of the first real stitch, and back down into the last stitch. The join disappears – vital on the gold centre, where a slip-stitch join would leave a lump.
Petals over a chain arch
Working the petal into the ch-5 arch (instead of into stitches) creates the open eyelet. Keep the arch chains loose – if they are tight the petal will cup forwards. Some makers go up a hook size for the arches only.
Join-as-you-go on the last round
From the second motif on, Round 8 is worked as a join: at each corner, work 1 sc, then instead of the middle sc, slip stitch into the corner of the neighbouring motif, then complete the corner. Along the sides, replace every 4th sc with a slip stitch into the matching stitch of the neighbour. At four-way corners, always join to the same corner slip stitch to avoid a hole.
Managing ends on a big project
With around six ends per motif, the finishing can feel endless. Our approach: crochet over the tail of the previous colour for the first 6–8 stitches of every new round, then weave the remaining tails at the end of each motif before you join it. Never leave weaving for “later” on a 132-motif project – batch it as you go and the final assembly is pure joy.
Blocking & finishing
Pin each motif to a 19 cm square template (a printed grid on foam mats is ideal), with a pin in each petal tip and corner. Spray thoroughly with water, leave to dry completely, and only then join. After the border, give the whole bedspread a light steam – never press an iron directly onto the gold centres or you will flatten their texture.
The pillow shams
Each sham front is one giant motif: work Rounds 1–6 as written, then repeat Round 7 four more times (adding 4 dc to every side each time) until the square measures about 45 cm. Back with a plain white sc panel, join the two layers with red sc, and finish with the same scallop edge as the bedspread.
Styling it at home
Crisp white sheets, a natural jute rug and a pine garland across the headboard let the red read as pure Christmas. Out of season, flip to the white-flower side of the room and pair it with soft greens – the white flowers carry it into winter long after the holidays.
Care
Machine wash cool (30°C) inside a large laundry bag on a gentle cycle, or hand-wash in the bath. Dry flat – never hang a crochet bedspread wet, as the weight will stretch it. Red cotton may release dye on the first wash: add a colour-catcher sheet.
Ready to make it?
The complete written pattern – materials, every round with stitch counts, the joining method, border, shams, abbreviations, FAQ and troubleshooting – is right here on this page, 100% free. Make your test motif tonight, block it, and you will know within an evening whether your gauge is ready for the heirloom.
Starting rounds — magic ring and first increases
Why You'll Love This Pattern 💛
It is a real heirloom: hundreds of crisp, glossy poinsettia stars that look hand-painted on the bed, built with clever construction that keeps every motif perfectly square.
Shaping with increases — building the body
Switch Things Up 🎨
Try burgundy and ivory for a vintage look, emerald and white for a winter-garden version, or all-white with gold centres for a wedding bedspread.
Colour variations — personalise your make
Common Mistakes & How to Fix Them 🔧
Tension drifts over weeks of work. Measure every 10th motif against your first one and re-block or remake any that differ by more than 5 mm.
Each motif is joining to a different point. Always slip stitch into the very first corner join made at that intersection.
The ch-3 tip is being worked too tight. Keep it loose and pin the tip out sharply when blocking.
Rnd 6 heights are off. Corner points must be tr, the side tips must be sc – the height difference is what squares the octagon.
Too many sts in Rnd 1. Stick to 29 sc per motif side plus 1 per join, and count before working the shells.
Pre-wash a red swatch; if it bleeds, wash the finished piece with a colour-catcher and cold water only.
Assembly stage — pinning pieces before sewing
Materials Needed for Red and White Poinsettia Star Flower Bedspread
🪝Tools & Notions
(motifs) and 3.0 mm hook (border)
(at least 10)
— Gauge:
one motif = 19 cm square after blocking
— Finished Size:
Queen ~ 215 x 235 cm
— Yarn Weight:
DK mercerised cotton (red, white, gold)
— Hook:
3.5 mm (US E/4) + 3.0 mm for joins
— Terms:
US Crochet Terminology
— Cost:
FREE ✓
Crochet Abbreviations
Red and White Poinsettia Star Flower Bedspread — Full Pattern
🧶Motif A (red flower) – make 66
🧶Motif B (white flower) – make 66
🧶Layout & join-as-you-go
🧶Border
🧶Pillow shams (make 2)
Assembly & Finishing Tips
💡 Weaving in ends
Use a tapestry needle to weave each tail back and forth through at least 5–6 stitches in different directions. A tiny dot of washable glue on the final stitch before trimming adds extra security for toys used by children.
💡 Sewing pieces together
Pin each piece firmly to the body before sewing. Use mattress stitch for the most invisible join — insert the needle under the same yarn bar on alternating pieces and pull firmly. Knot securely at start and end, weave both tails deep into the body.
💡 Positioning safety eyes
Take time here — eye spacing determines the character's entire personality. Closer eyes look more intense; further apart looks more friendly and playful. Pin both positions and step back before snapping the backs on permanently. Once snapped, eyes cannot be moved without damaging the fabric.
💡 Blocking
Not required for amigurumi, but lightly steam-blocking any warped pieces will relax the fibres. Hold a steam iron a few centimetres away — never let it touch the stuffing or safety eyes directly.
💡 Care instructions
Handwash in cool water with mild detergent, press gently to remove excess water, lay flat to dry. Many acrylic yarns are machine washable on a gentle cycle in a laundry bag — always check your yarn label.
⚠️ Important Notes
- Use stitch markers at the start of every round — don't rely on memory to count.
- Work with consistent tension throughout. Gauge swatch before starting if in doubt.
- Fasten off leaving long tails for sewing — at least 30cm for each piece you'll need to attach.
- Pin and check positioning of all pieces before sewing any of them permanently.
Beginner's Guide to Amigurumi 🌱
Amigurumi (Japanese: ami = knitted/crocheted + nuigurumi = stuffed toy) is the craft of making small crocheted characters. You start with a magic ring, work in continuous spiral rounds of single crochet, and shape the piece through increases and decreases — no seams, no joins, no turning.
The magic ring creates a closable centre with no hole. Wrap yarn around two fingers, insert the hook, yarn over and pull through. Work your first round into this ring, then pull the tail to close tight. Practise a few times — it becomes effortless quickly.
The invisible decrease — insert your hook through the front loop only of the first stitch, then the front loop only of the second stitch. Yarn over, pull through both loops, then yarn over again and pull through the remaining two. Working through front loops only makes the decrease blend into the fabric instead of leaving a bump.
Tension matters most. Amigurumi needs tight, firm tension so stuffing can't show through. If you can see white fiberfill peeking between your stitches, go down one hook size. The fabric should feel dense and firm — like a tightly woven canvas, not a loose net.
The finished Red and White Poinsettia Star Flower Bedspread — ready to gift or display
You Ask, We Answer ❓
132 motifs (11 x 12): 66 red-flower and 66 white-flower motifs, plus two giant sham motifs.
You can, but the petal points will not block as sharply and the sheen will be lost. If you choose acrylic, steam-block lightly instead of wet-blocking.
Your ch-5 arches are too tight. Chain loosely, or work the arches only with a hook one size bigger.
No – you can whip-stitch or sc-join after blocking, but JAYG gives a flat, invisible join and saves hours of sewing at the end.
That is part of the design, but if you want more contrast, work Motif B Rnd 5 in a pale cream instead of white.
Yes – 3 x 9 motifs makes a beautiful 57 x 170 cm Christmas runner using about 15% of the yarn.
Each motif takes 30–40 minutes once you have the rhythm, so the motifs alone are around 75 hours, plus joins, border and shams.
Finished handmade pieces may be sold – please credit Cozy Amigurumi. Do not resell or redistribute the pattern itself.