Granny Square Christmas Wreath with Bow and Jingle Bells
Advanced
For experienced crocheters who enjoy complex shaping, fine detail, and ambitious construction
Multi-Day Project
A rewarding 12+ hour journey — perfect for dedicated crafters who love detailed work.
Handmade Gift
A beautiful keepsake — free forever. Read online or print at home.
About This Granny Square Christmas Wreath with Bow and Jingle Bells
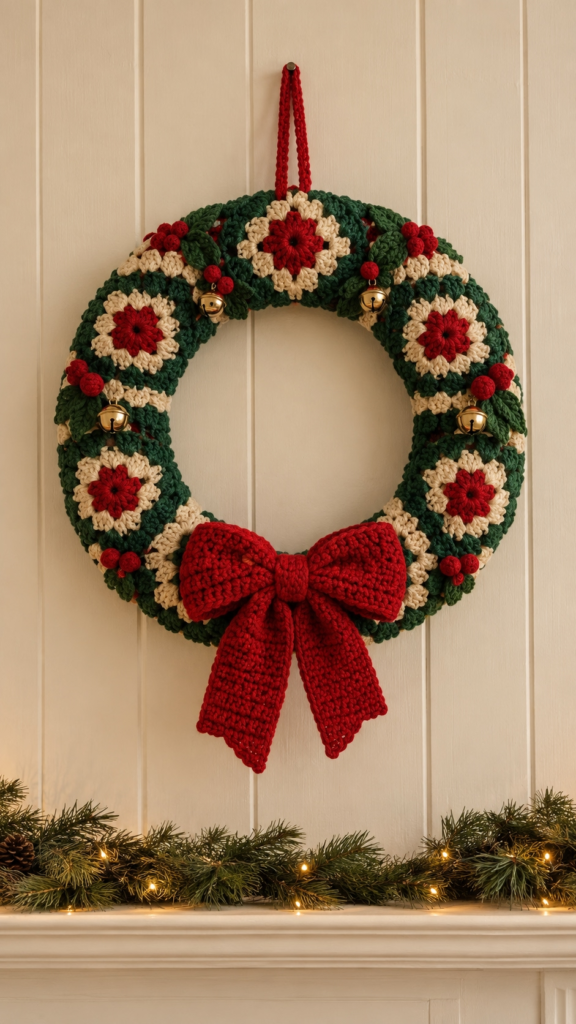
A big, squishy granny square wreath for the front door: a forest-green tube cover patterned with red-and-cream flower grannies, sprigs of crocheted holly with red berry clusters, five brass jingle bells and a generous textured bow with pointed tails. The granny squares are not just glued on – they are the cover. Shaping a flat granny strip so it wraps a curved ring without bagging on the inside or straining on the outside is the real lesson in this pattern, and it is why we call it advanced.
About this design
A wreath form is a torus – its outer circumference is much longer than its inner one. A straight strip of grannies will bunch around the inner edge. To fix this, we work wedge-shaped connector panels between the granny squares: short-row sections in green that are taller on the outer edge (tr) and shorter on the inner edge (sc). Six flower grannies alternate with six cream-and-green striped connectors, and the whole strip is then wrapped around the form and seamed on the back. The result is a smooth, fitted cover that keeps its shape for years.
What you will learn
- Graded-height short rows (sc → hdc → dc → tr across a single row) to create curve.
- Fitting a crochet cover to a 3D form and seaming it invisibly with mattress stitch.
- Shaped holly leaves with picot points.
- A firm, structured bow with shaped, pointed tails that hang straight.
Yarn and the form
Use a smooth worsted or aran yarn – acrylic is ideal for an outdoor door wreath because it shrugs off damp. Wool blends look richer indoors. You need approximately green 150 g, cream 60 g, red 120 g. The form is a 30 cm (12″) foam or straw wreath ring, about 5 cm thick. Measure your form before you start: wrap a tape measure around the tube (the “girth”) – ours is 18 cm. Your granny square plus connectors must stretch to exactly that girth, minus 1 cm for negative ease.
The maths of a curved cover
Outer circumference of a 30 cm ring with a 5 cm tube: about 110 cm. Inner circumference: about 63 cm. That is a ratio of roughly 1.75 : 1. Our 6 grannies (9 cm each) give 54 cm on both edges, so the 6 connectors must add 56 cm on the outer edge but only 9 cm on the inner edge – about 9.5 cm outside and 1.5 cm inside each. That is exactly what the graded short rows below do. If your form is a different size, recalculate with these figures and add or remove short rows.
Short rows, explained
In each connector row you work sc for the first few stitches (the inner edge), then hdc, dc and finally tr on the outer edge. Over 4–5 rows, the outer side grows far faster than the inner side, so the strip curves into an arc. Lay the strip flat as you work: after all 12 pieces are joined, it should form an almost-closed ring the size of your form.
Holly and berries
The holly leaves are made from a foundation chain, worked up one side and down the other with picot points at each lobe, then given a slight twist when sewn on so they look natural. Berries are tiny stuffed balls worked in red and sewn on in clusters of three. Group them in odd numbers – it always looks more natural.
The bow
The bow is worked in rows of hdc in the third loop (behind the top loops), which gives that tight, ribbed texture. The loops are one long rectangle pinched in the middle; the tails are separate strips that taper to a point and are edged with a small picot. A little spray starch on the tails keeps them hanging straight.
Finishing touches
Five 25 mm brass jingle bells are sewn on with doubled red yarn between the holly sprigs. The hanging loop is a twisted chain cord sewn deep into the back seam so it bears the weight properly. If the wreath is for an exterior door, add a few stitches of clear fishing line around the form through the back seam to stop it rotating.
Ready to make it?
The full written pattern is right here and free: grannies, curved connectors, assembly, holly, berries, bow and hanging loop, plus abbreviations, FAQ and troubleshooting. One weekend, one ring, and your door is ready for Christmas.
Starting rounds — magic ring and first increases
Why You'll Love This Pattern 💛
It is a classic granny wreath done properly – a fitted, curved cover that hugs the ring – topped with holly, jingle bells and a showpiece bow.
Shaping with increases — building the body
Switch Things Up 🎨
Make it in cream, sage and blush for a Scandinavian winter look, or orange, mustard and brown with a plaid bow for autumn.
Colour variations — personalise your make
Common Mistakes & How to Fix Them 🔧
The back seam is uneven. Pin it every 5 cm before sewing and pull each section equally snug.
Some connectors were joined with the tr edge on the inner side. Flip them so every tr edge faces outward.
Your cover is too small for the form. Add one more row pair to each connector, or use a slightly thinner form.
Your chain was too tight. Use a hook one size larger for the foundation chain.
Loop piece too short. Make it 50+ rows and wrap the centre knot very tightly.
Use a green form, or wrap the foam in green yarn or fabric tape before fitting the cover.
Assembly stage — pinning pieces before sewing
Materials Needed for Granny Square Christmas Wreath with Bow and Jingle Bells
🪝Tools & Notions
(12") foam or straw wreath ring, approx 5 cm thick
(for the bow tails)
— Gauge:
one mini granny = 9 cm square
— Finished Size:
approx 40 cm diameter (on a 30 cm foam ring)
— Yarn Weight:
Worsted / aran acrylic or wool blend (forest green, cream, red)
— Hook:
4.0 mm (US G/6)
— Terms:
US Crochet Terminology
— Cost:
FREE ✓
Crochet Abbreviations
Granny Square Christmas Wreath with Bow and Jingle Bells — Full Pattern
🧶Flower granny (make 6)
🧶Curved connector (make 6, cream and green stripes)
🧶Assembly
🧶Holly leaves (make 10, green)
🧶Berries (make 12, red)
🧶Bow (red)
🧶Hanging loop and finishing
Assembly & Finishing Tips
💡 Weaving in ends
Use a tapestry needle to weave each tail back and forth through at least 5–6 stitches in different directions. A tiny dot of washable glue on the final stitch before trimming adds extra security for toys used by children.
💡 Sewing pieces together
Pin each piece firmly to the body before sewing. Use mattress stitch for the most invisible join — insert the needle under the same yarn bar on alternating pieces and pull firmly. Knot securely at start and end, weave both tails deep into the body.
💡 Positioning safety eyes
Take time here — eye spacing determines the character's entire personality. Closer eyes look more intense; further apart looks more friendly and playful. Pin both positions and step back before snapping the backs on permanently. Once snapped, eyes cannot be moved without damaging the fabric.
💡 Blocking
Not required for amigurumi, but lightly steam-blocking any warped pieces will relax the fibres. Hold a steam iron a few centimetres away — never let it touch the stuffing or safety eyes directly.
💡 Care instructions
Handwash in cool water with mild detergent, press gently to remove excess water, lay flat to dry. Many acrylic yarns are machine washable on a gentle cycle in a laundry bag — always check your yarn label.
⚠️ Important Notes
- Use stitch markers at the start of every round — don't rely on memory to count.
- Work with consistent tension throughout. Gauge swatch before starting if in doubt.
- Fasten off leaving long tails for sewing — at least 30cm for each piece you'll need to attach.
- Pin and check positioning of all pieces before sewing any of them permanently.
Beginner's Guide to Amigurumi 🌱
Amigurumi (Japanese: ami = knitted/crocheted + nuigurumi = stuffed toy) is the craft of making small crocheted characters. You start with a magic ring, work in continuous spiral rounds of single crochet, and shape the piece through increases and decreases — no seams, no joins, no turning.
The magic ring creates a closable centre with no hole. Wrap yarn around two fingers, insert the hook, yarn over and pull through. Work your first round into this ring, then pull the tail to close tight. Practise a few times — it becomes effortless quickly.
The invisible decrease — insert your hook through the front loop only of the first stitch, then the front loop only of the second stitch. Yarn over, pull through both loops, then yarn over again and pull through the remaining two. Working through front loops only makes the decrease blend into the fabric instead of leaving a bump.
Tension matters most. Amigurumi needs tight, firm tension so stuffing can't show through. If you can see white fiberfill peeking between your stitches, go down one hook size. The fabric should feel dense and firm — like a tightly woven canvas, not a loose net.
The finished Granny Square Christmas Wreath with Bow and Jingle Bells — ready to gift or display
You Ask, We Answer ❓
Yes – measure the girth of the tube and the inner and outer circumference, then adjust the number of tr/dc rows in each connector (see the maths section).
Glue yellows and pulls off over time. A fitted cover looks neater, lasts for years and can be removed and washed.
Yes, if it is under a porch. Use acrylic yarn, a foam (not straw) form, and bring it in during heavy rain.
The connectors are too tall on the sc side. Replace the 3 sc with 3 sl sts in Rows 2 and 4.
Yes – replace them with extra berry clusters. Small bells are a choking hazard for little children.
Spray starch them and dry them hanging, with a clothes peg on the point for a little weight.
Finished handmade pieces may be sold – please credit Cozy Amigurumi. Do not resell or redistribute the pattern itself.